Chapter 01 · overview
Quick start
For a first inspection, follow this route: set up the kit, join its network, create the job, inspect and document each section, then review the final PDF.
Connect and start
Connect the camera and the accessories fitted to your kit. Power on the case and wait for the onboard computer to start.
Join Wi-Fi, then open ITS Report
Connect the tablet or computer to the case Wi-Fi. Then open the ITS Report Android app, or enter http://192.168.150.1 in Chrome or Chromium Edge.
Create the job
Create or resume a report, choose the customer, complete the header and add the first inspected section.
Inspect and deliver
Check the image and distance, record video and observations, complete the sections, then review and export the PDF.
Local operation: video, captures and reports work on the kit's local network. Cloud transfer and some online map layers require Internet access and setup.
Chapter 02 · before going on site
Prepare the inspection kit
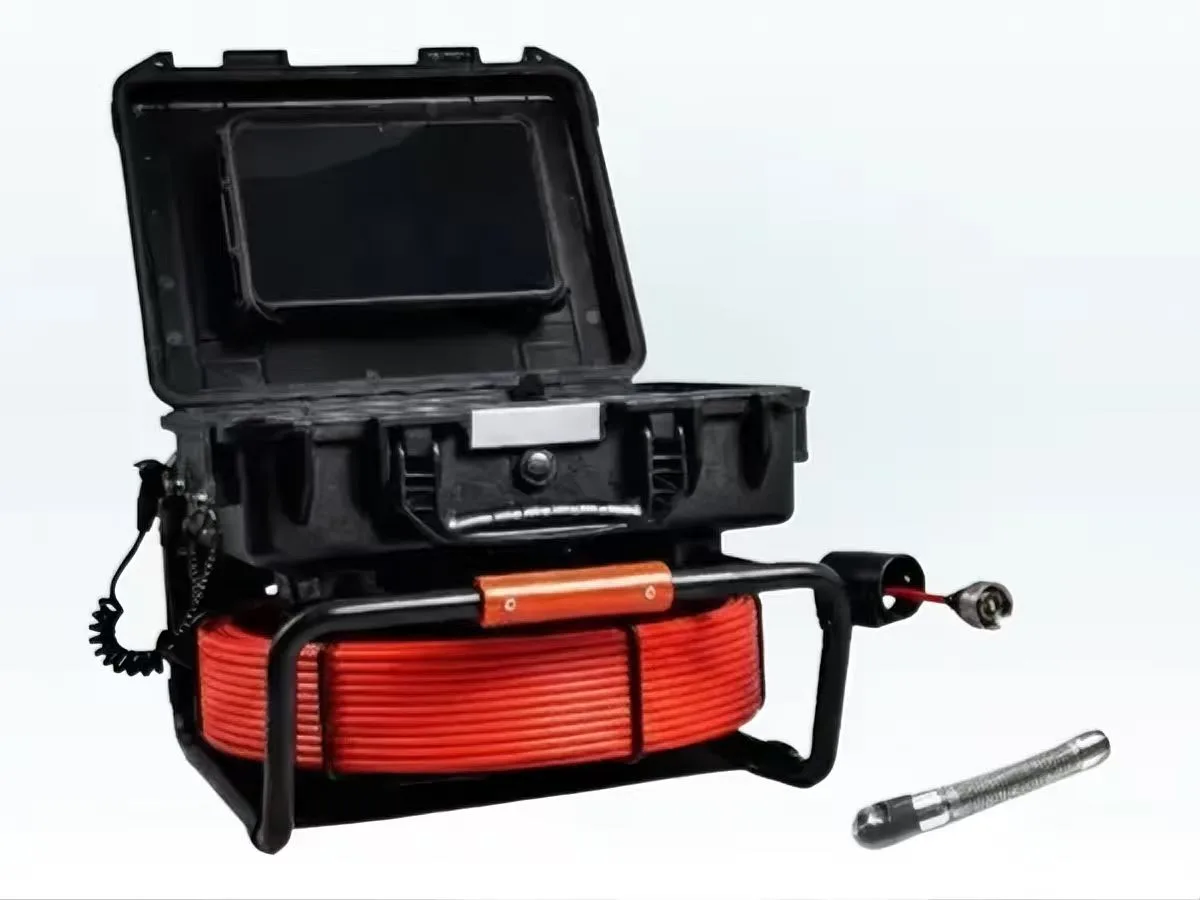
A short preflight check protects your measurements and saves time during handover. Exact accessories depend on the kit configuration.
- Case powered and display working.
- Camera, cable, reel and lighting connected.
- Tablet charged and ITS Report available.
- Enough local storage for video and captures.
- Job reference and customer details ready.
- Internet access plan known if cloud transfer is required.
Choose your workflow
Live inspection: open the camera interface and prepare an express report or an existing job. Previously recorded media: open the reports dashboard and import or attach the video and captures to the correct section.
Record the inspection direction, distance reference and start/end nodes before moving the camera. These references keep observations in the right order.
Chapter 03 · local access
Start and connect
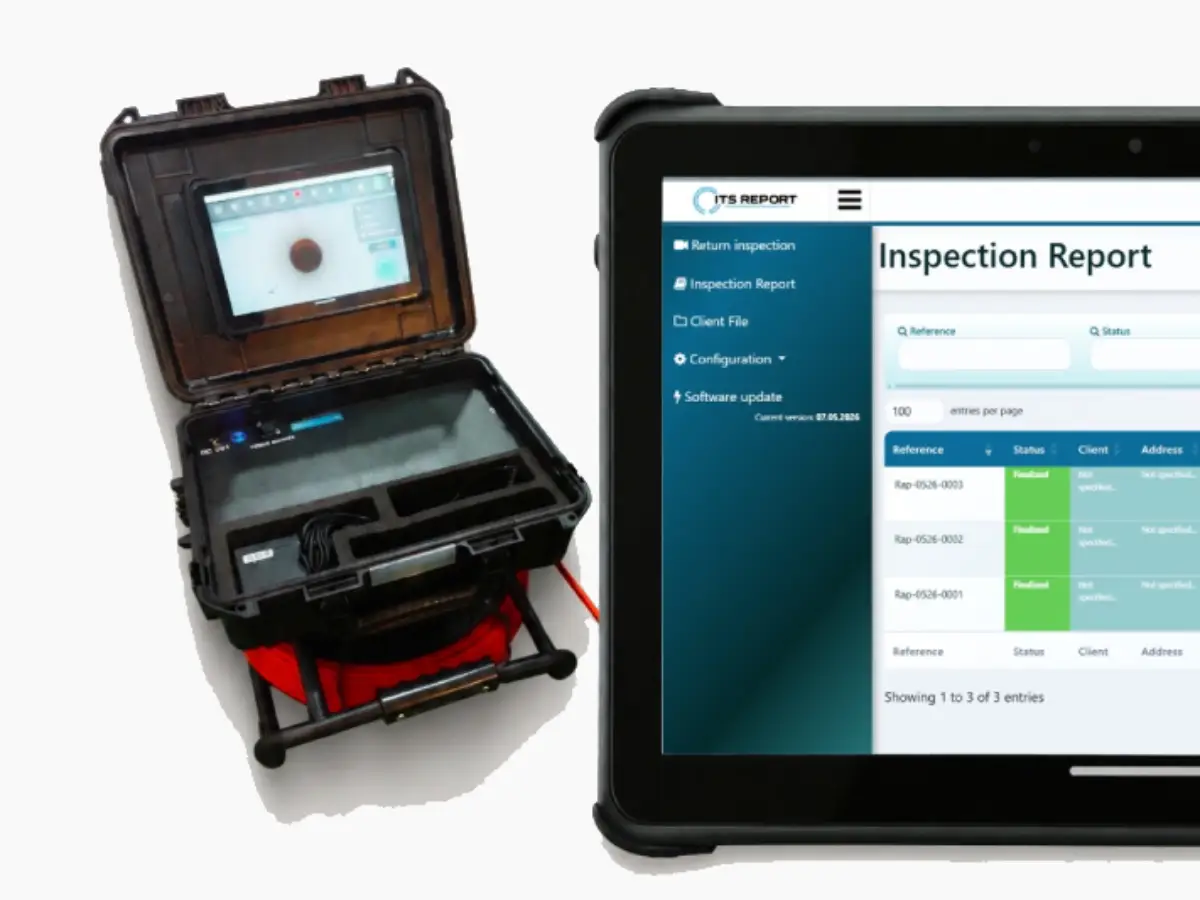
The case hosts ITS Report on its local network. You can connect through the ITS Report Android app on a compatible phone or tablet, or through a browser on a computer connected to the case Wi-Fi.
Android app and browser: the same first step. The phone, tablet or computer must join the case Wi-Fi. The Android app does not bypass this connection.
- Power on the case and wait for its onboard computer and Wi-Fi.
- On every device, join the case Wi-Fi (often
werobotic-xxxxxxx) using the credentials supplied with your equipment. - With the ITS Report Android app, open it on the phone or tablet already connected to that Wi-Fi. It searches for the case and loads the local interface. If Wi-Fi was enabled after launching the app, let the search resume or retry it.
- With a browser, enter
http://192.168.150.1in the address bar of Chrome or Chromium Edge, not in a search box. - Check that the camera view or report interface appears before beginning work.
Browser support: use Chrome or Chromium Edge for the current interface. Safari and Firefox are not supported. The local address only works while connected to the case network.
Local Wi-Fi and Internet are separate
The case Wi-Fi gives access to local inspection functions even without Internet. Cloud transfer and online map backgrounds also need the relevant external connection. With a compatible Android app version, mobile data can provide that Internet connection while Wi-Fi remains linked to the case.
Chapter 04 · platform setup
Set up the inspection case
The Settings control on the camera screen opens platform configuration. Review these settings during commissioning, after a software update and whenever you change camera, reel or working conditions.
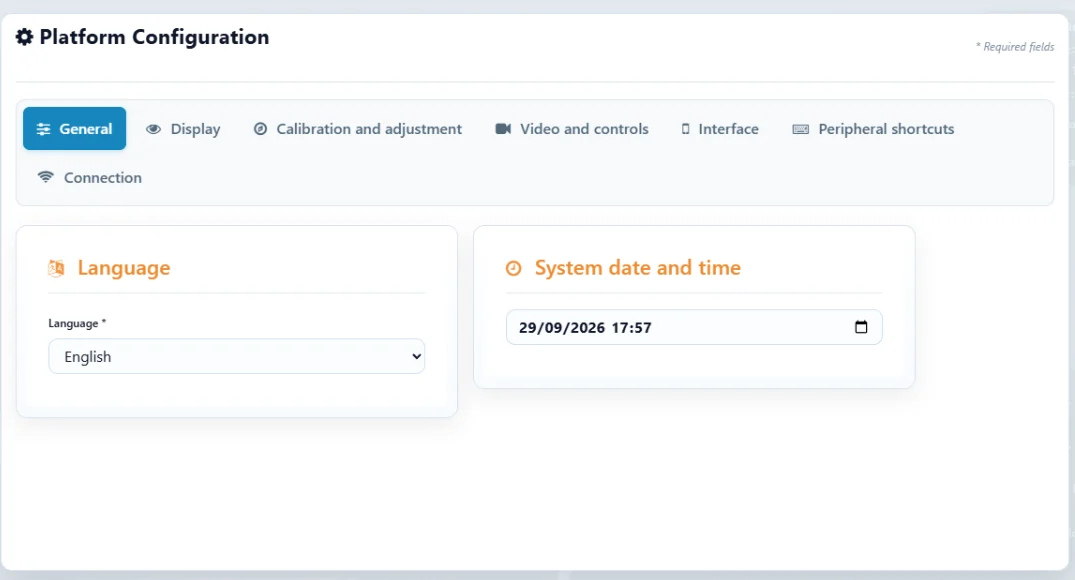
| Tab | What to check |
|---|---|
| General | Language, system date and time; confirm timestamps before creating a report. |
| Display | Measurements, instruments, text area and on-screen layout. |
| Calibration and adjustment | Distance counter, starting heading and available sensors; calibrate for your equipment. |
| Video and controls | Resolution, frame rate, live image quality and target recording bitrate. |
| Interface and shortcuts | Widget layout and keyboard, mouse or gamepad assignments. |
| Connection | Local address, Wi-Fi network and Internet state; Wi-Fi password remains masked until requested. |
Set video without losing a recording
- Finish any recording before changing video parameters.
- Choose a resolution and frame rate actually advertised by the connected camera. Check sharpness and motion in live view.
- Live JPEG quality affects the live stream; target recording bitrate mainly affects the stored video size. Explicit JPEG quality may cause the Pi to re-encode the stream and use more CPU.
- Save, restart cameras if prompted, then record and play back a short test clip.
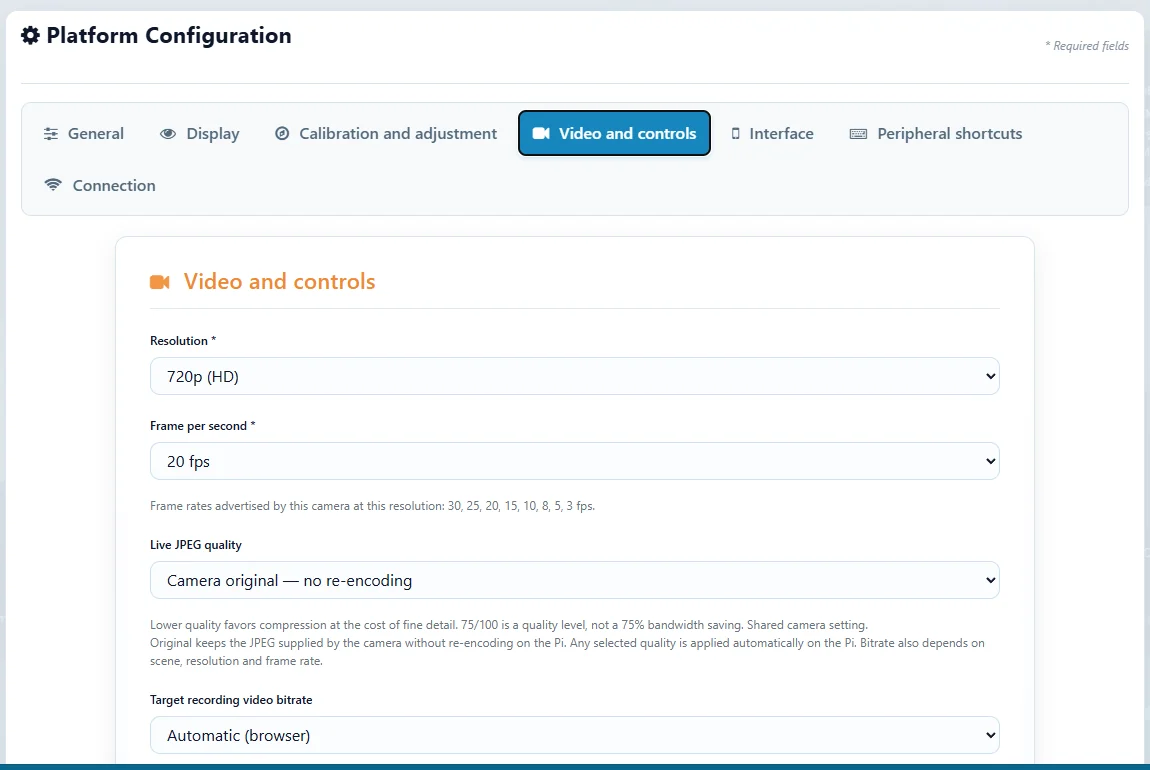
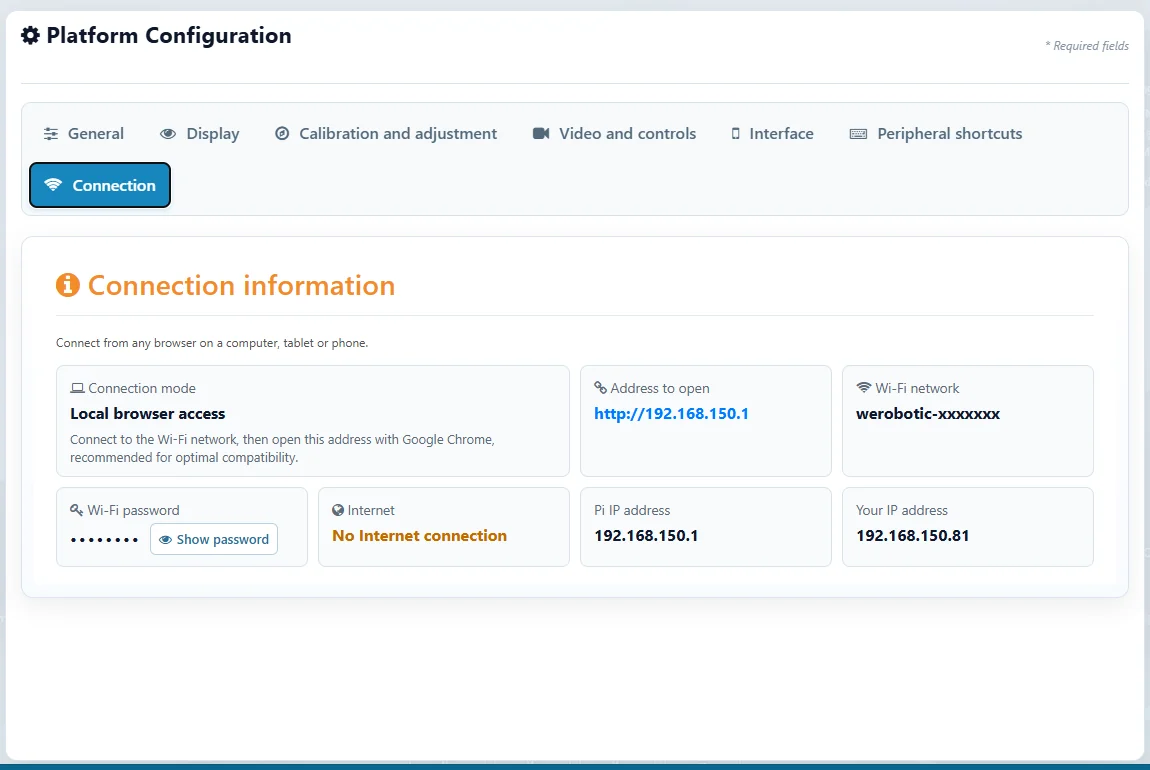
The camera platform Settings window is separate from Configuration on the reports dashboard, which controls report identity and numbering. See the dedicated report identity chapter.
Chapter 05 · orientation
Interface and controls
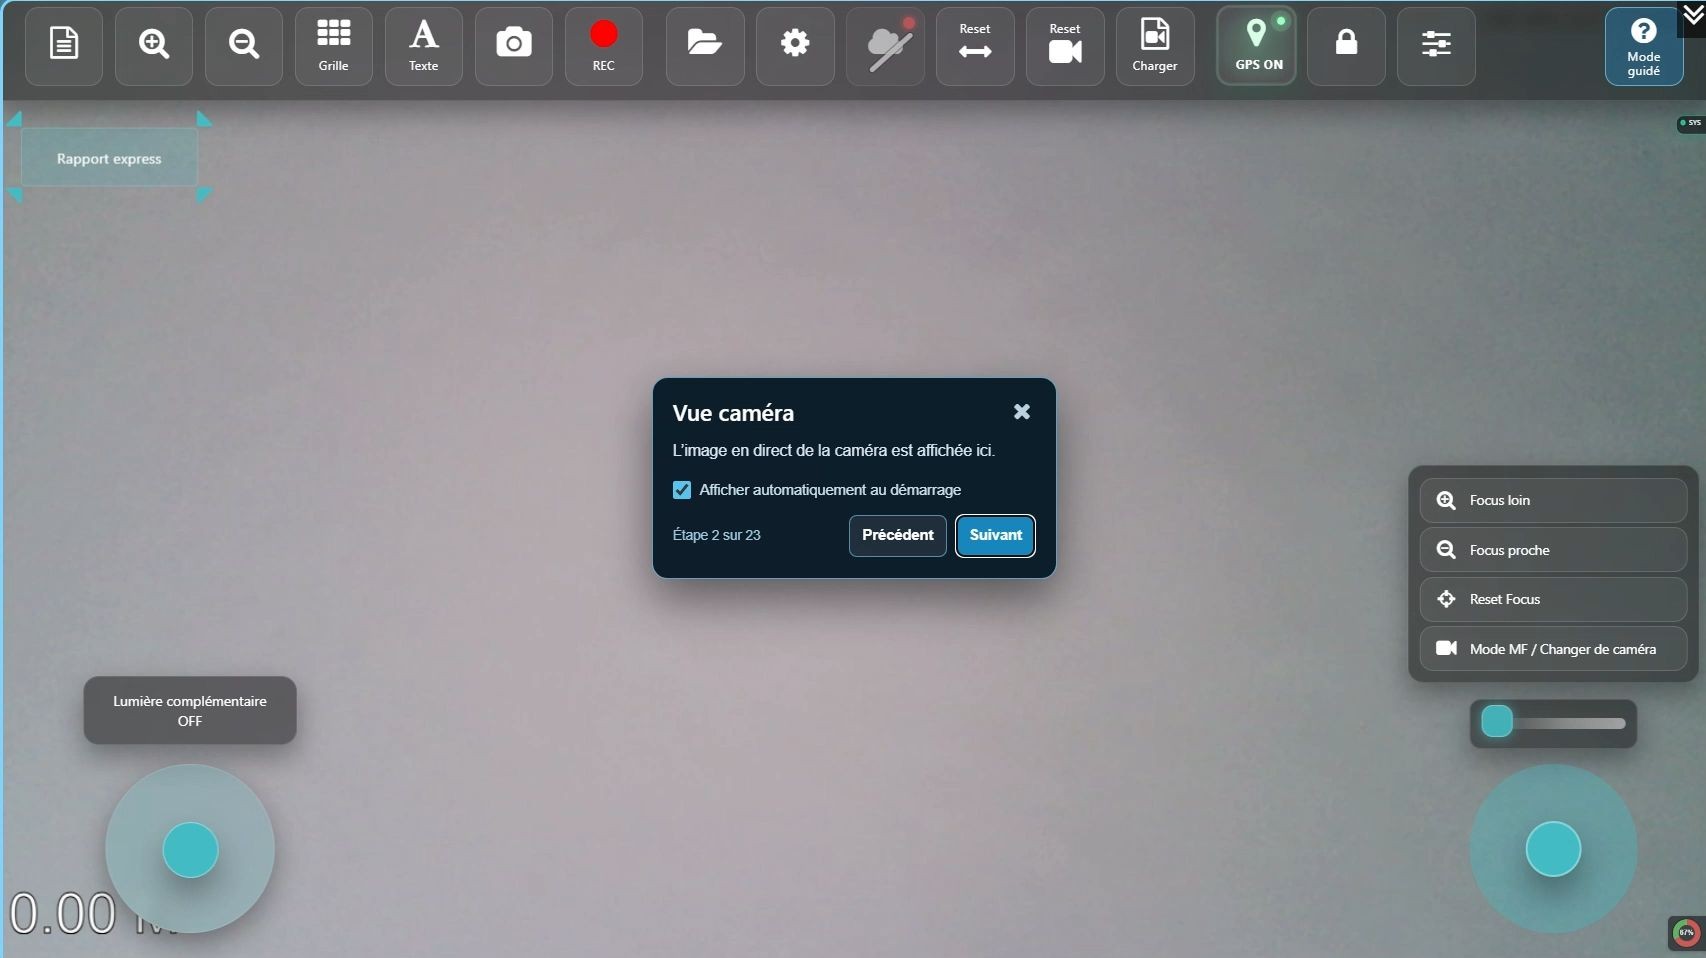
The main area displays live video or playback. The top bar contains inspection actions. Side panels and controls vary with the camera, accessories and active mode.
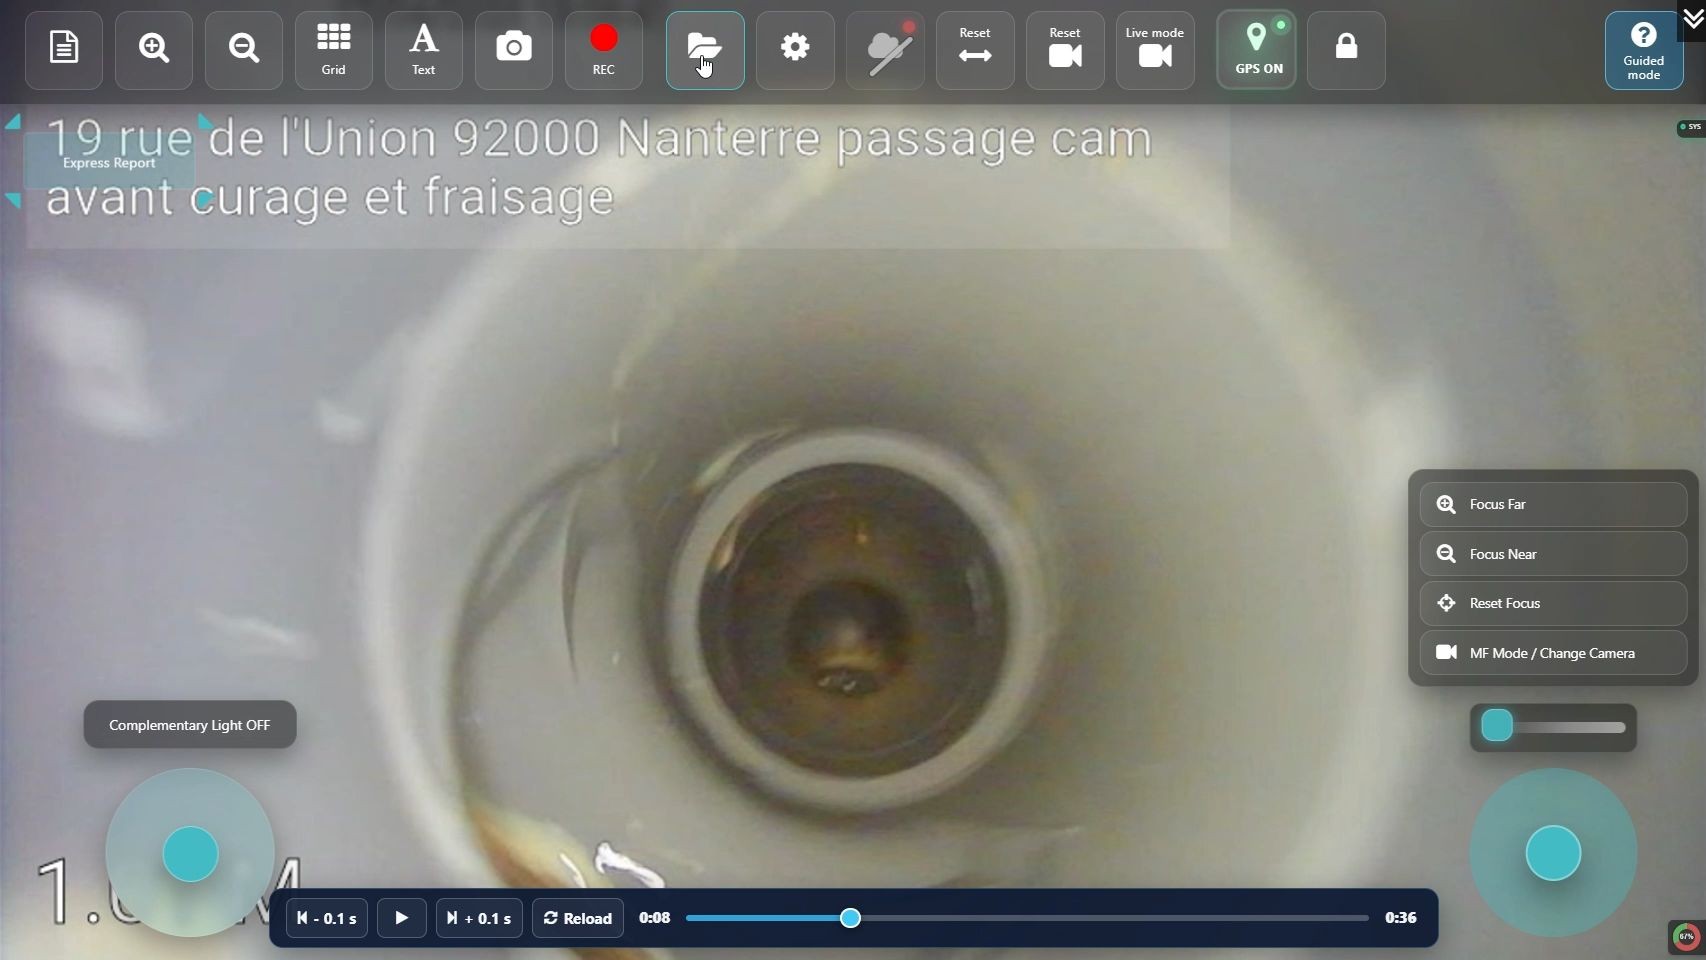
Control reference
These are the icons used in the ITS Report toolbar. Available controls depend on the camera and accessories.
| Control | What it does | Check |
|---|---|---|
| Express report / Reports | Start a job during inspection or open the reports dashboard. | Confirm the customer and active section. |
| Zoom + / − and grid | Magnify the view and display a visual grid. | Digital zoom does not move the camera; the grid is indicative. |
| Text / Photo | Annotate or save the displayed frame. | Keep important defects visible. |
| REC / Pause / Stop | Record, pause or finish a video. | Stop recording before restarting the camera or system. |
| Media / Local video | Find files and replay recorded video. | Attach media to the right report and section. |
| Reset m / Reset cam | Reset the distance reference or restart the camera stream. | Document any reset during a section. |
| GPS / trajectory | Use browser location as an origin when allowed. | Check permission and position quality. |
| Settings / Cloud | Adjust the interface and open cloud settings. | Transfers need Internet access and permissions. |
| Image / Focus / LED | Adjust display, focus and lighting. | Availability depends on the camera. |
| Camera / Joysticks | Switch source or control the head and robot. | Check surroundings before moving. |
| Lock / System shutdown | Lock widgets or shut down the Pi cleanly. | Finish recordings first. |
The “?” guided tour explains each control without moving the robot or changing settings.
Chapter 06 · during inspection
Inspect and record
Confirm the image and distance reference before moving. Keep the active job and section clear so captures can be filed correctly.
Set the image
- Position the head, check lighting and adjust near or far focus if available.
- Zoom in for detail, then return to a wide view to preserve context.
- Treat the grid as a visual aid, not a calibrated measurement.
- Reset the distance counter at the agreed start point before progressing.
Photos and video
Photo stores the displayed frame. REC begins recording, Pause suspends it and Stop closes the file. Check the media list after stopping. Playback controls appear when replaying local video.
Finish any recording before resetting the camera or shutting down the system. Note the current distance and section if a restart is needed.
Chapter 07 · document identity
Customize report identity
From Reports → Configuration, prepare the identity associated with jobs. Its menu contains Profile, Company, Logo and Report numbering. Then review each report's header: this controls what the PDF actually shows.
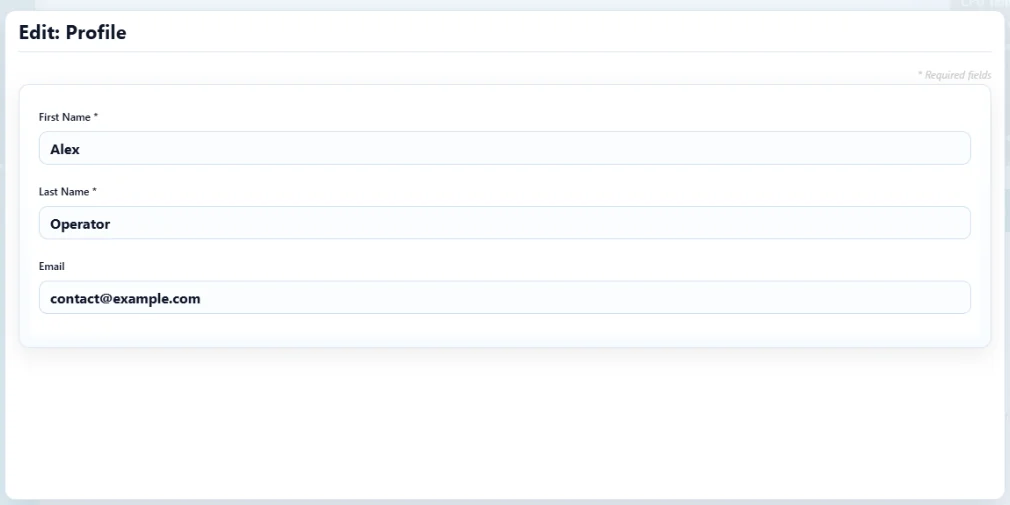
1. User profile
Open Configuration → Profile and enter first name, last name and optionally email. When you create a new job, the profile's first and last name identify its creator in report details. The technician printed in the PDF is a separate field in that report's header; verify it for every inspection.
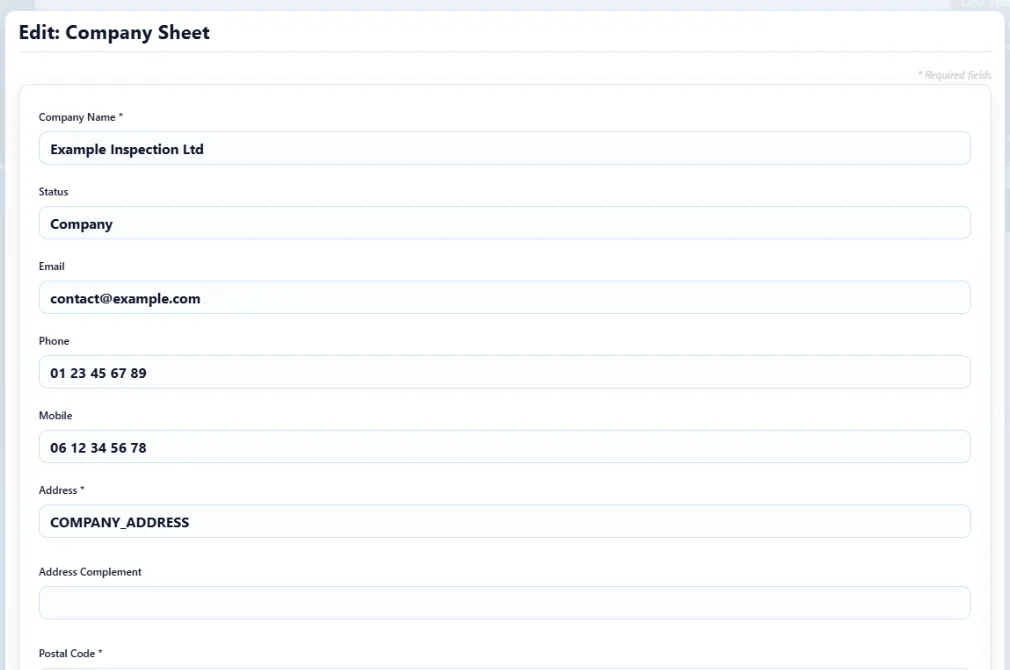
2. Company details
In Configuration → Company, enter the company name, full address and contact details. The form also offers legal status, email, phone numbers, registration number, business code, VAT number and capital. Save all required fields. The company name and address appear in the report header when company identity is selected.
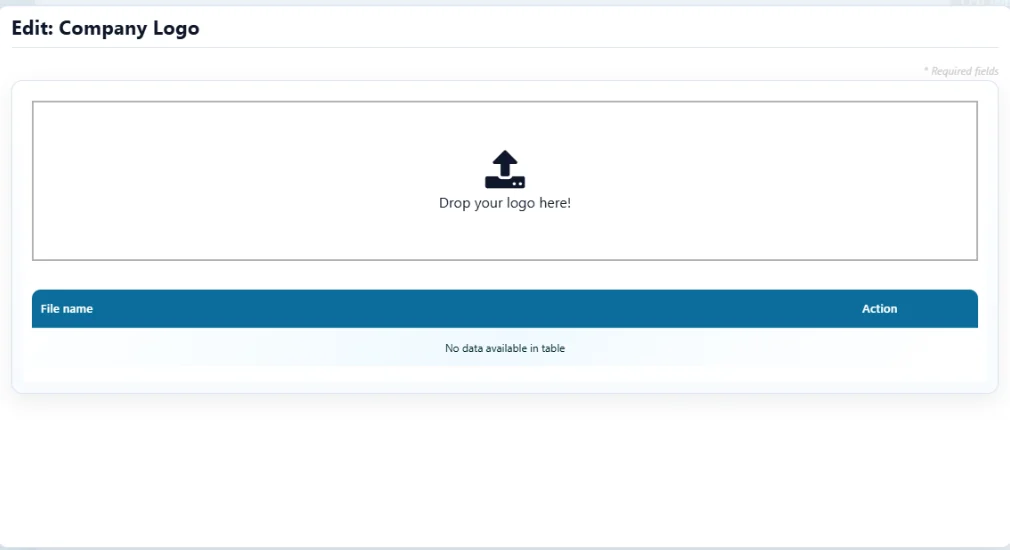
3. Report logo
Open Configuration → Logo and upload a JPG, PNG or WebP image. The app resizes it; uploading a new company logo replaces the previous one. Choose a clear image that remains legible on white, then inspect a PDF preview. The logo shown in the case interface is configured separately from the report logo.
4. Number future reports
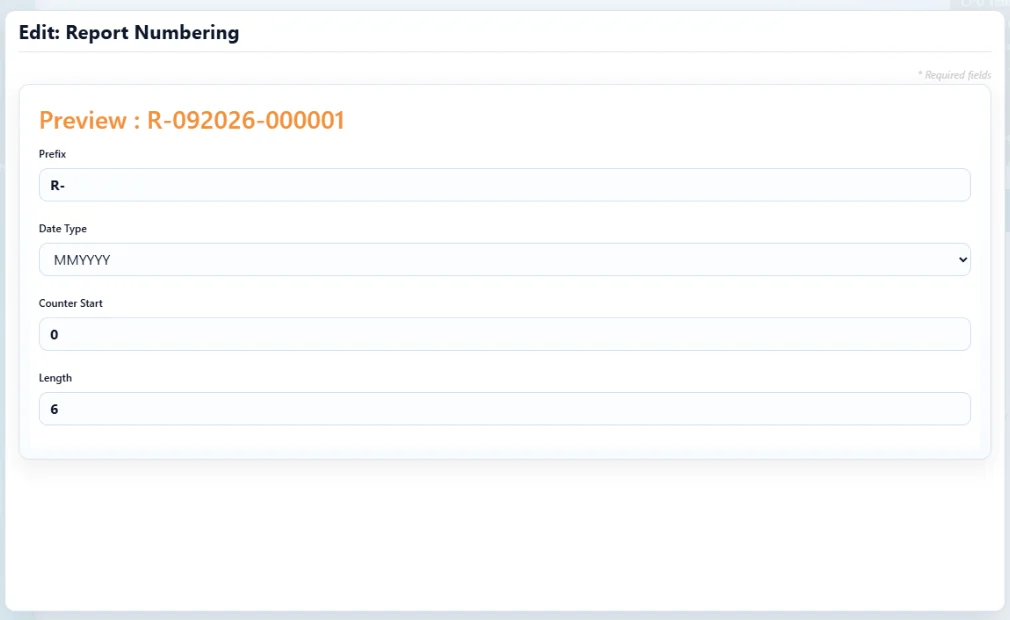
Configuration → Report numbering sets the prefix, date format, starting counter and reference length. Review the preview before saving. Change these conventions before creating new jobs and check the actual reference on each report.
5. Select the PDF header and technician
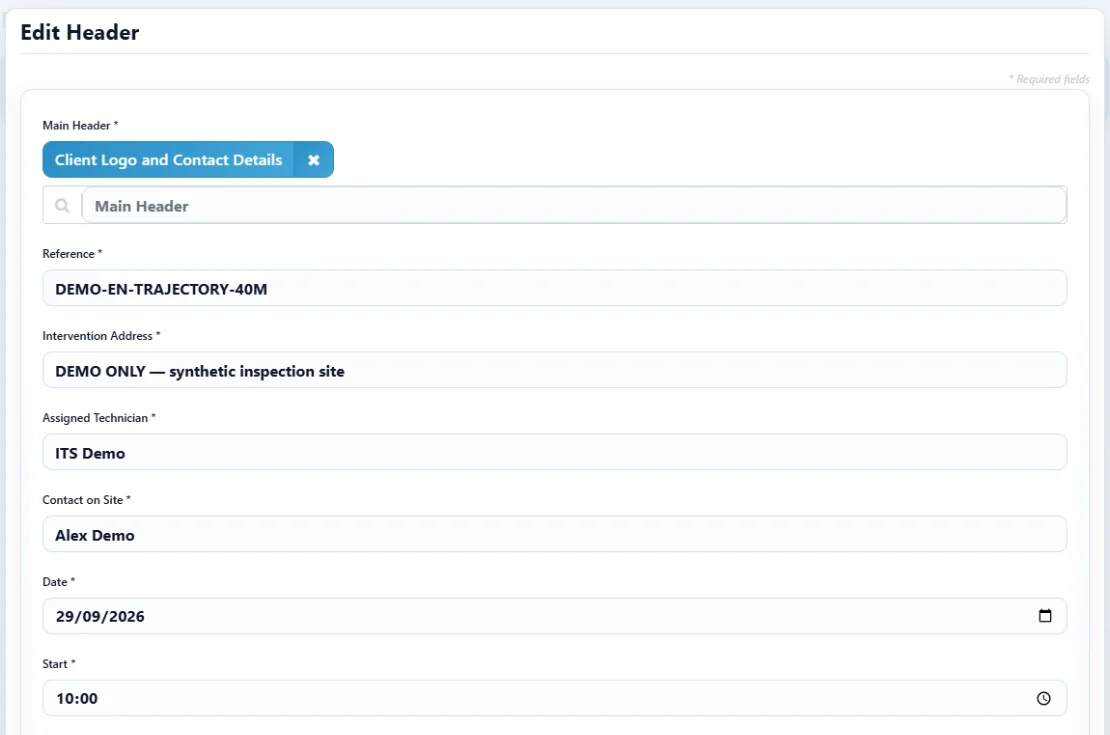
Open the job, choose Edit Report → Header and select Company logo and contact details or Client logo and contact details. Company identity is the default when no other header is chosen. Client identity uses the client record's logo and details when present. Enter the reference, site address, assigned technician, on-site contact, date and times. Save, regenerate the PDF preview and verify the displayed logo and names.
Final check: company record, user profile and assigned technician have different roles. After changing a logo or address, inspect a sample PDF before delivery.
Chapter 08 · customer job
Create or resume a report
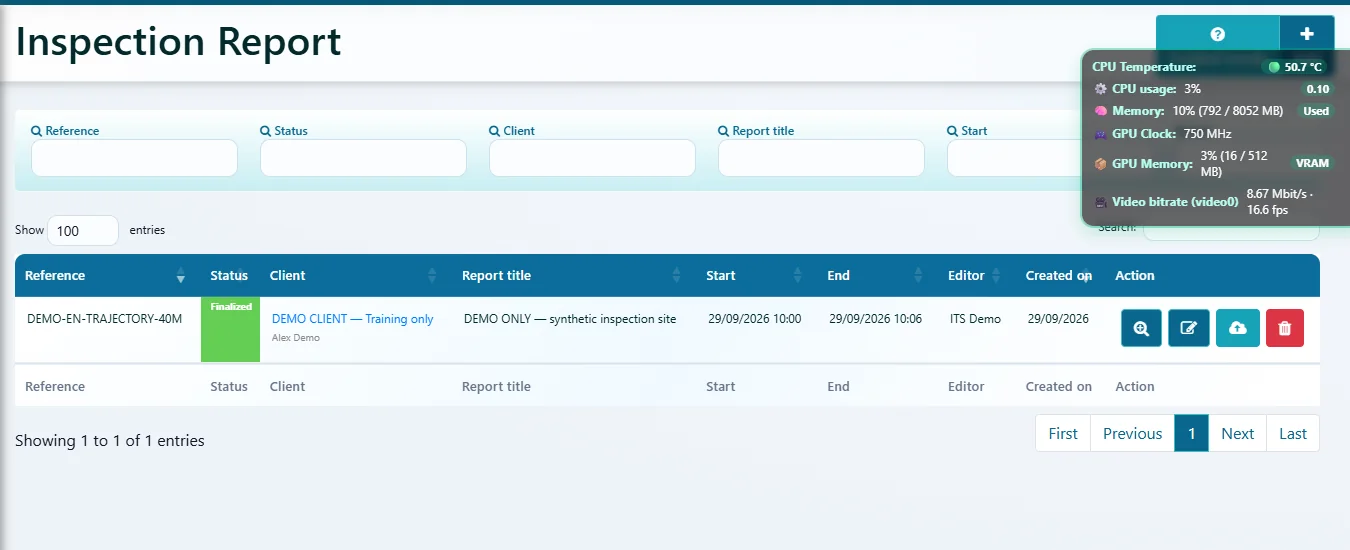
The dashboard is the starting point for creating, searching, opening and editing reports.
- Open Reports from the camera interface or application menu.
- Check or create the customer record. Company details and logo are configured in settings.
- Choose New report. Enter a clear reference, customer, address, operator, date and contact.
- Save the job and open its editor. To resume work, search for the reference and open its details.
- Before filming, check that captures will be associated with the correct report and section.
Express report: the guided route from a live inspection collects customer, general details and sections. You can also use the dashboard workflow.
Chapter 09 · inspection structure
Edit report and sections
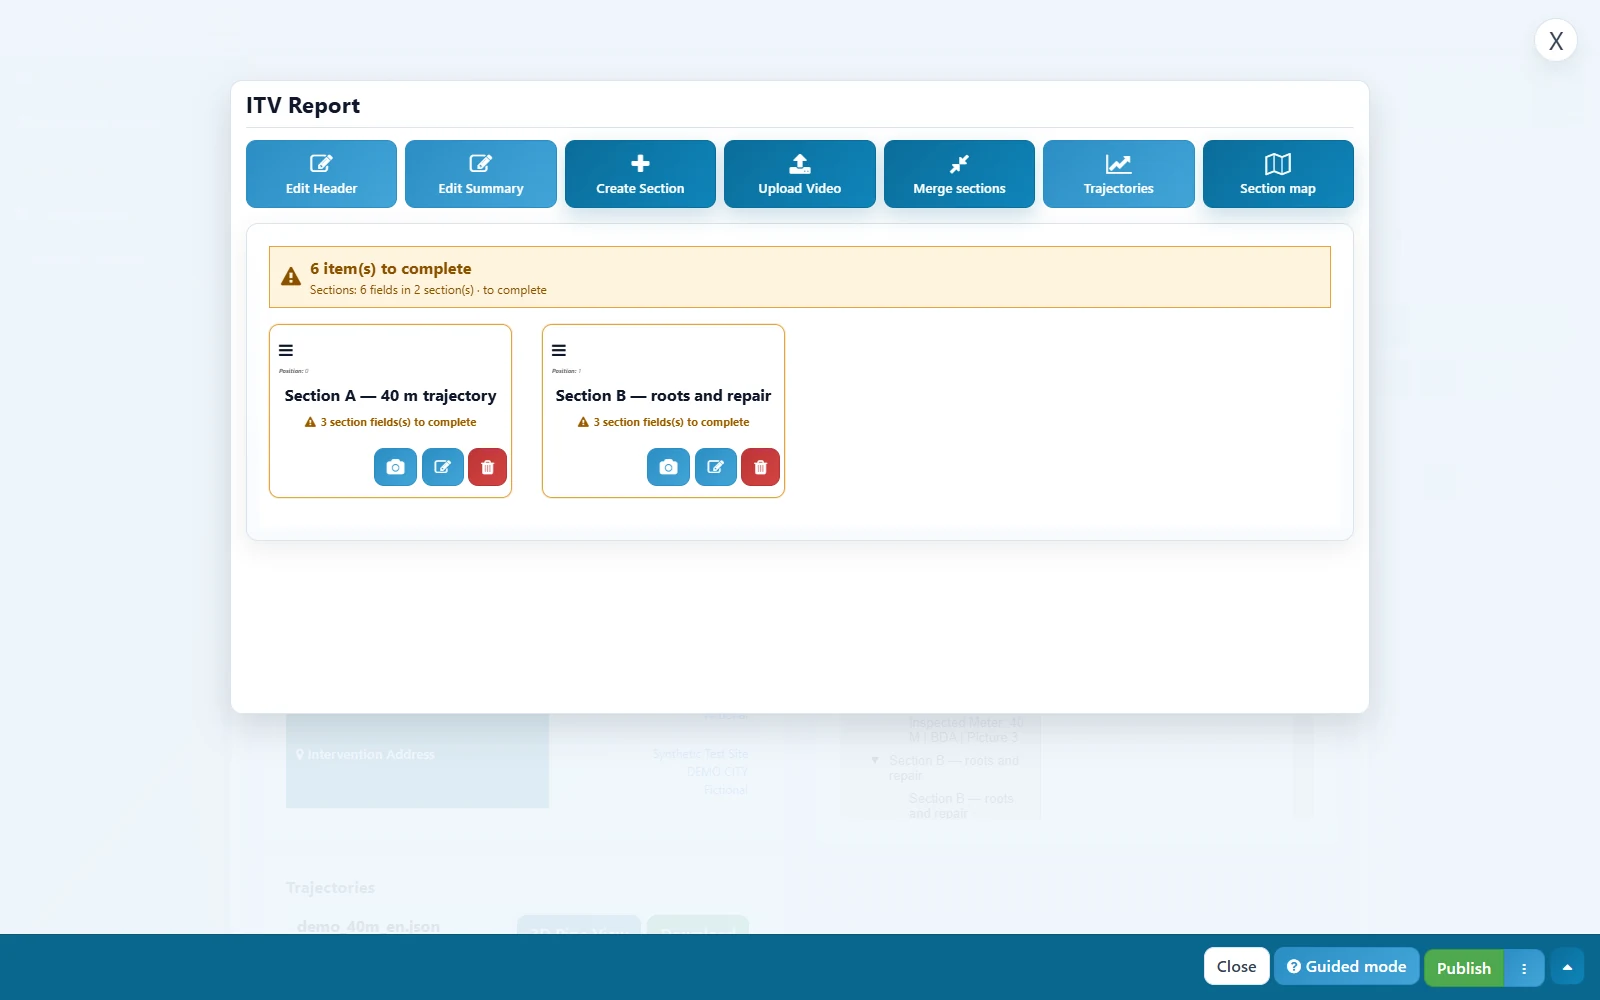
In the editor, complete the report header and summary, then create one section for each inspected length. Each section stores its own settings, media, distances and observations.
Describe a section clearly
- Give it a recognizable name and enter the upstream and downstream nodes.
- Check inspection direction and flow direction against what was observed on site.
- Complete the technical fields offered by the form: method, inspected asset, diameter, material, surroundings and applicable classification.
- Keep start and end distances consistent with the counter and media.
- If work stops early, record the actual end condition; create a new section if inspection resumes elsewhere.
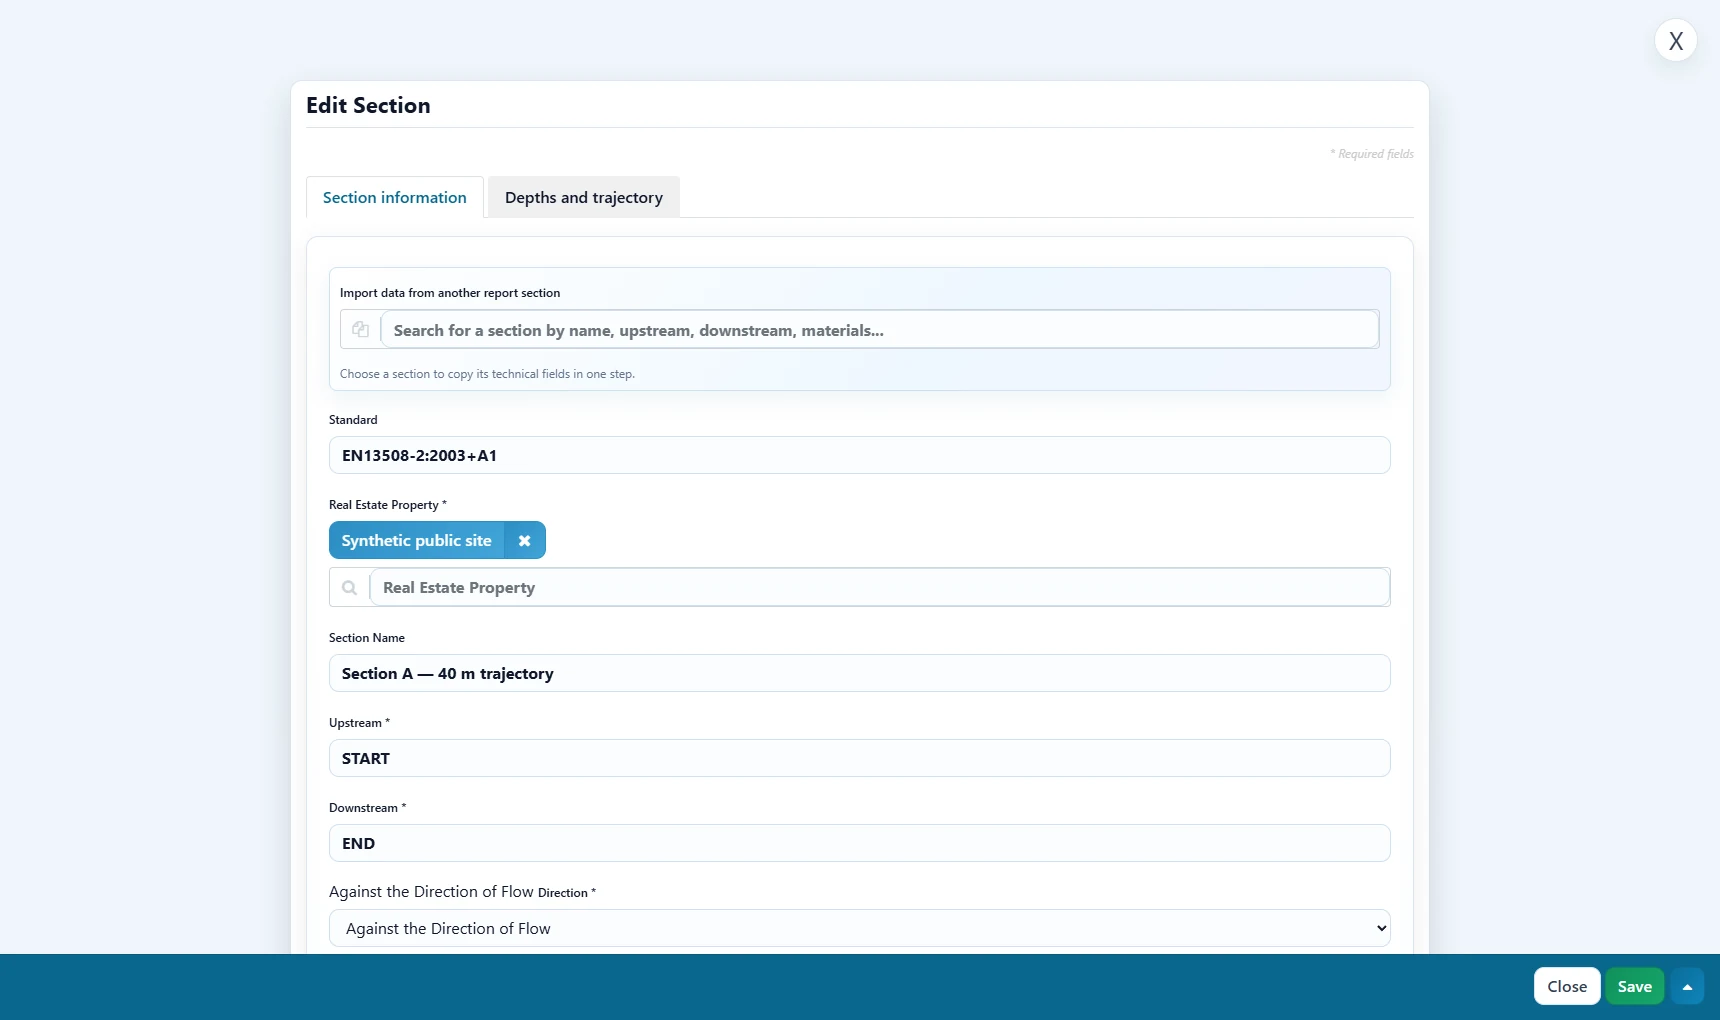
When sections share technical properties, importing values from another section can save re-entry. Review every copied value before saving.
Chapter 10 · evidence
Captures and observations
Associate each image with the right section and a usable distance. Qualification adds the meaning of an observation to the visual evidence.
- Open the section's captures area. Select an indexed video, raw image or existing capture; upload a new image where supported.
- Preview it and check its distance, date and readability.
- Open the capture editor and choose the observation type. Complete the fields required by the classification.
- Add a useful note about location, extent, material and intended action where your process requires one.
- Save and review the section's capture list before continuing.
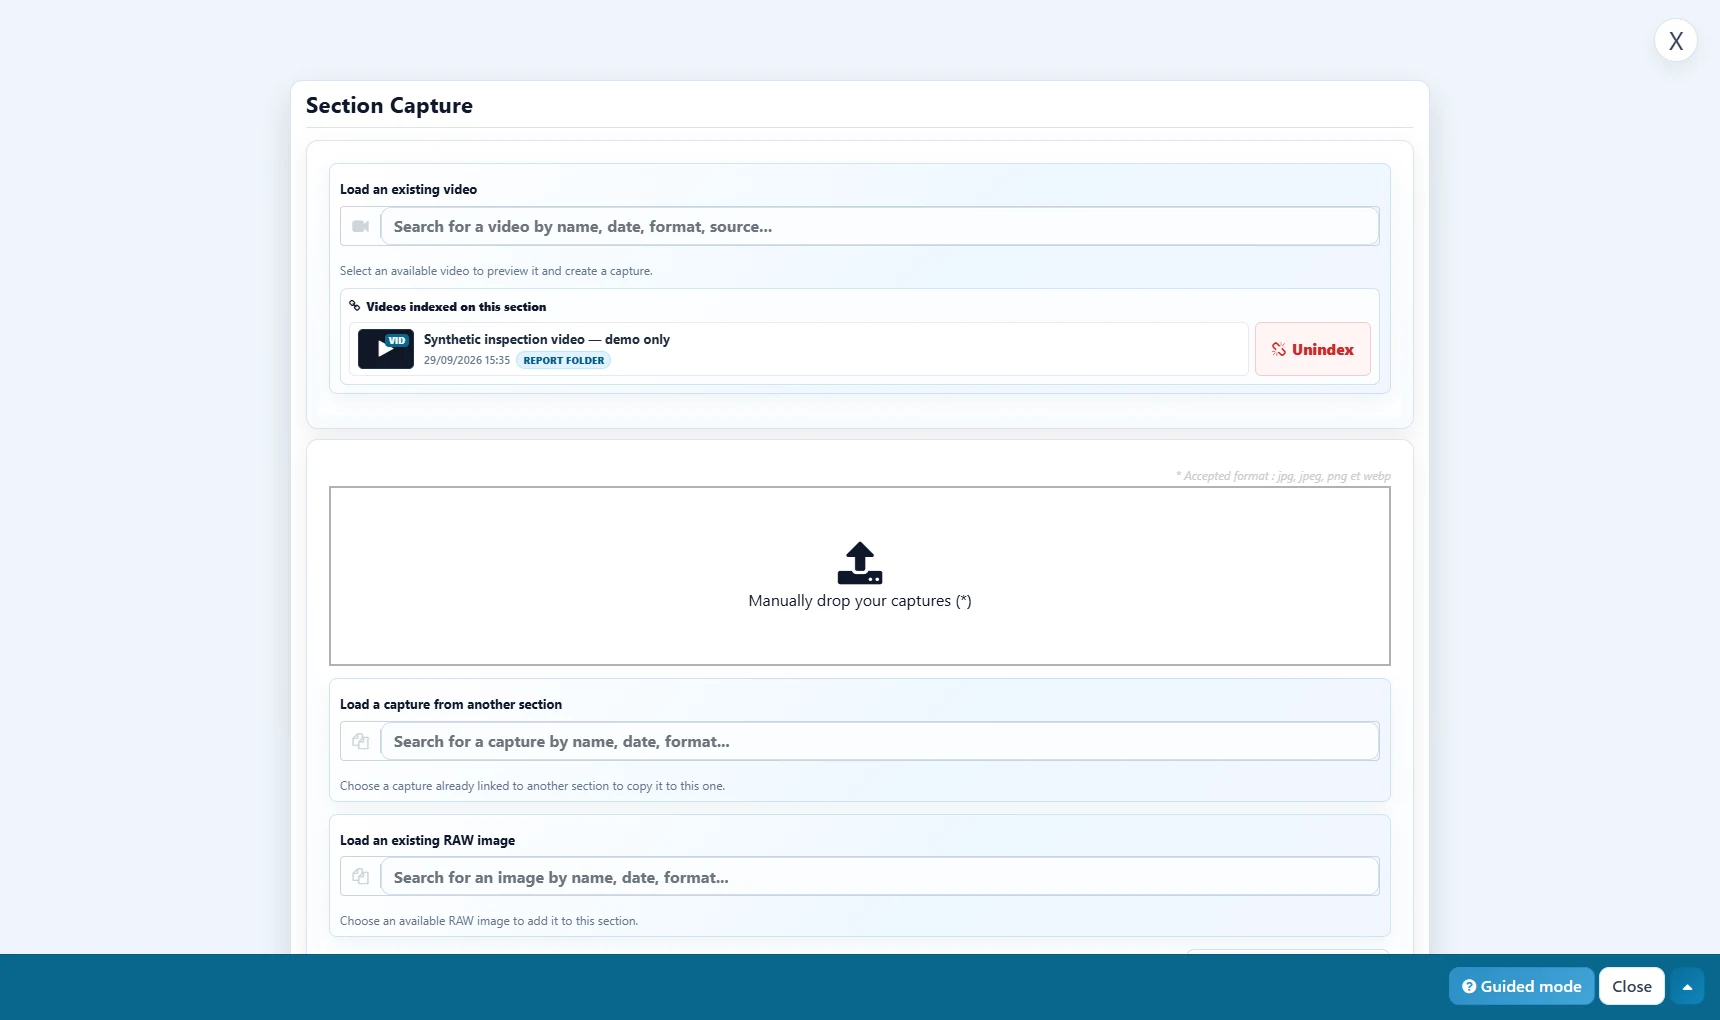
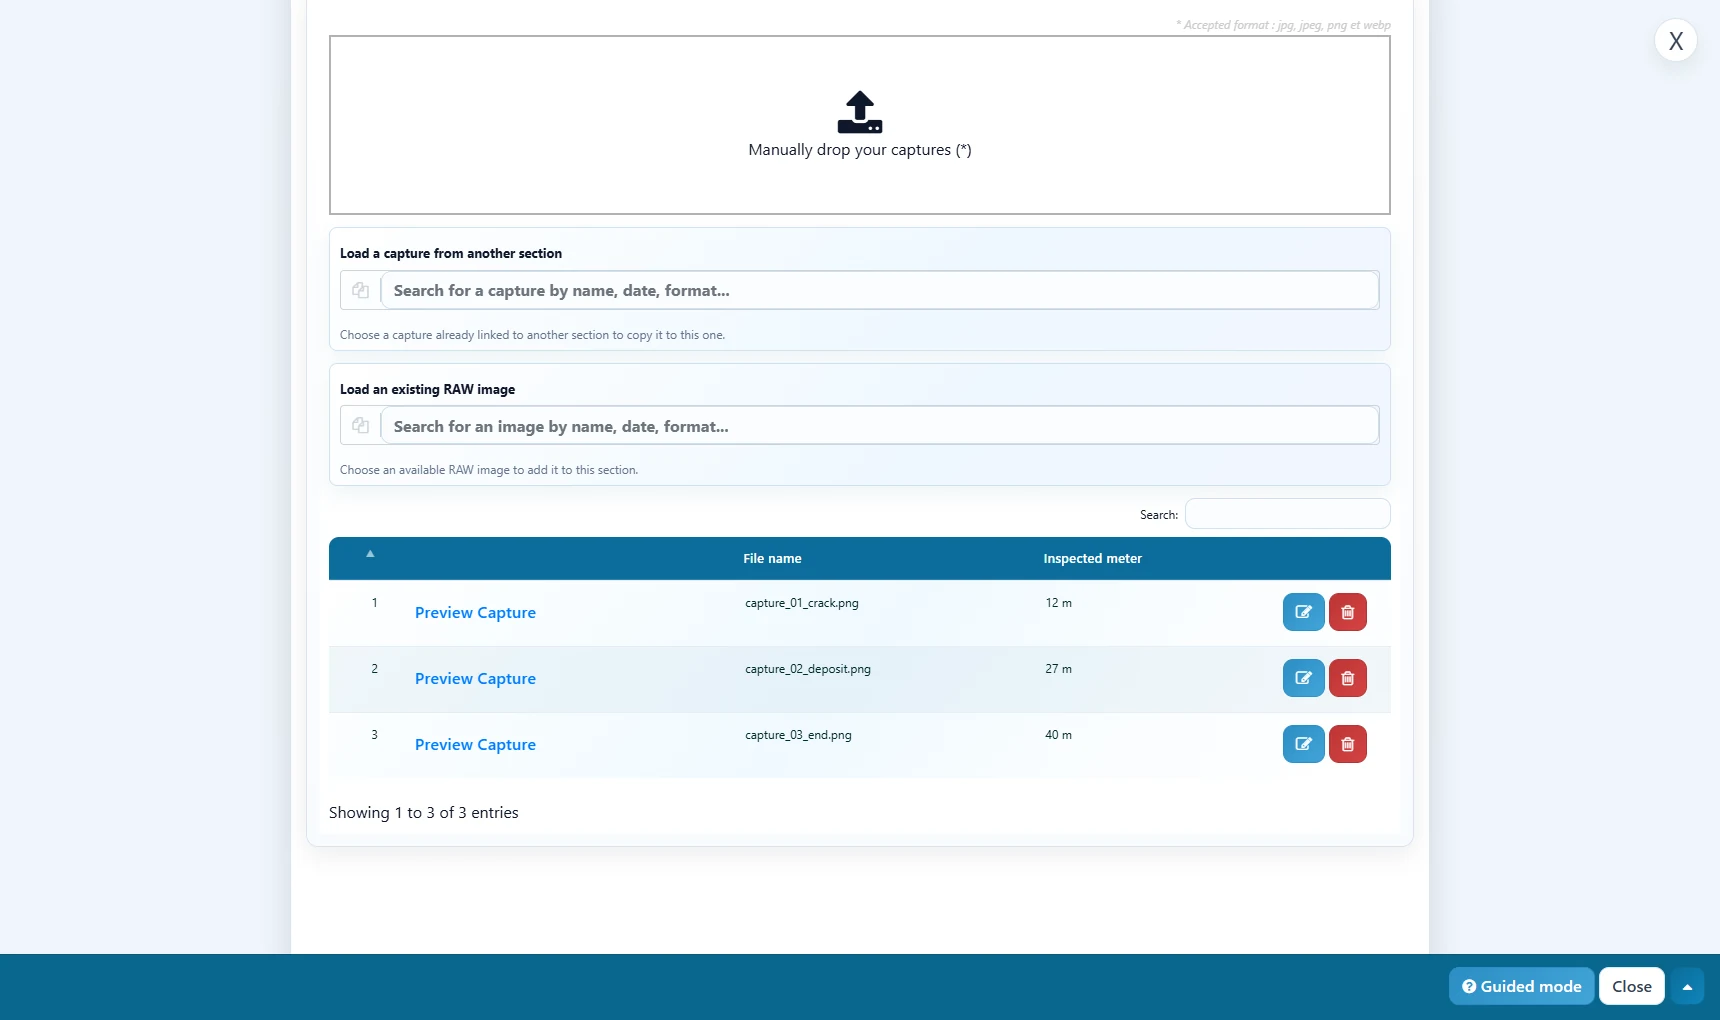
Do not infer a distance from an image alone. Resolve or document any difference between counter, video and capture before finalizing the report.
Chapter 11 · network location
Map sections and GPS
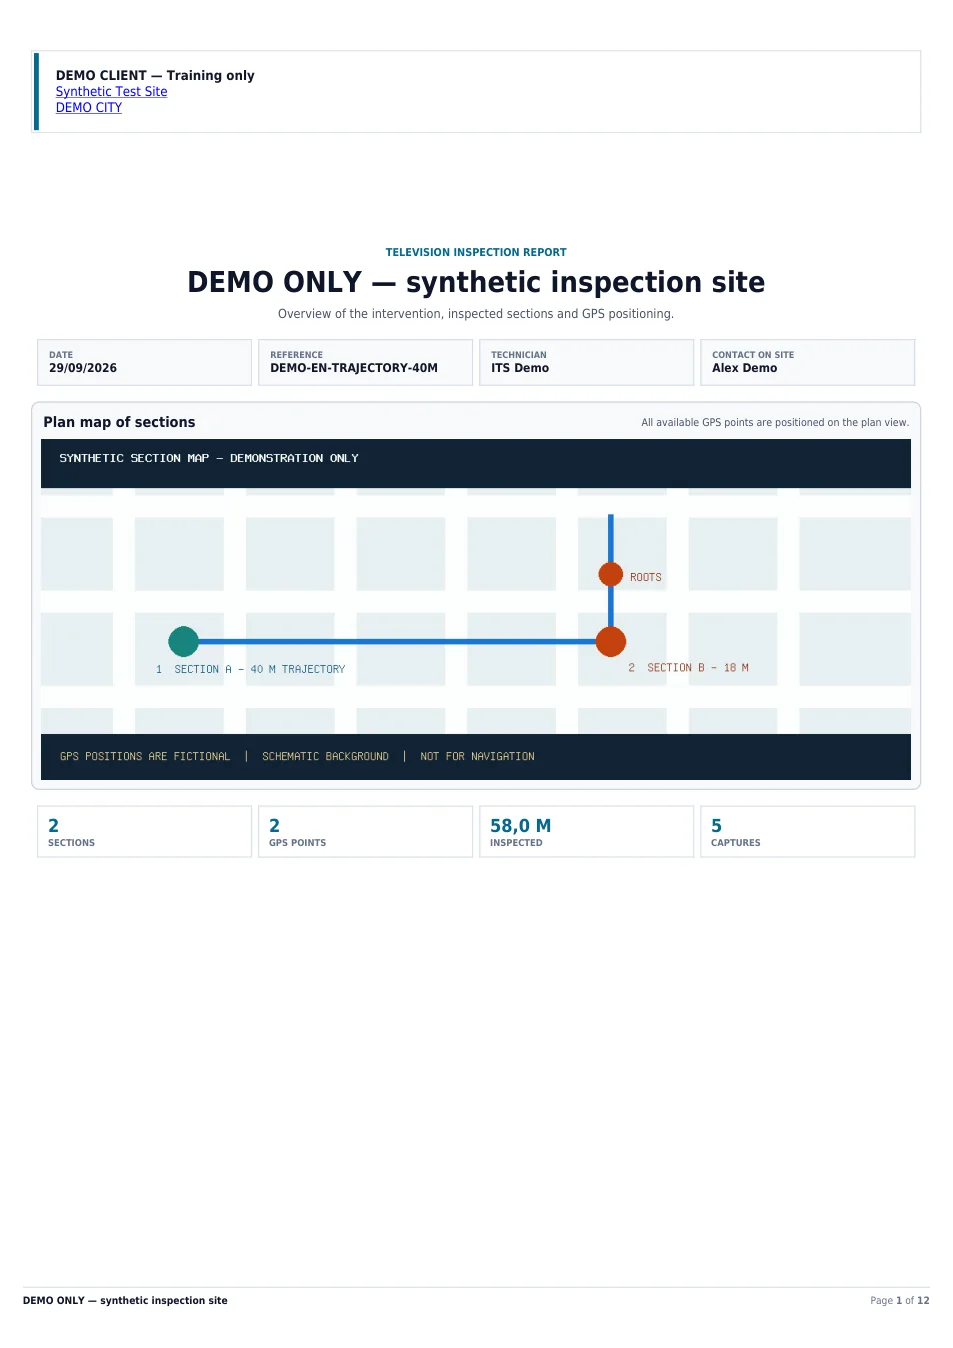
The map places sections and optional GPS points or context shapes. It can appear in the PDF when the corresponding option is enabled.
- Open Section map from the report editor.
- Choose the background and whether to show the map in the PDF. Online tiles may require Internet access.
- Select a section to place its GPS point or draw its route. Point, Line, Area and Circle tools add context.
- Group elements when several routes or markers coexist.
- Review placement and legend, save, and check the PDF preview.
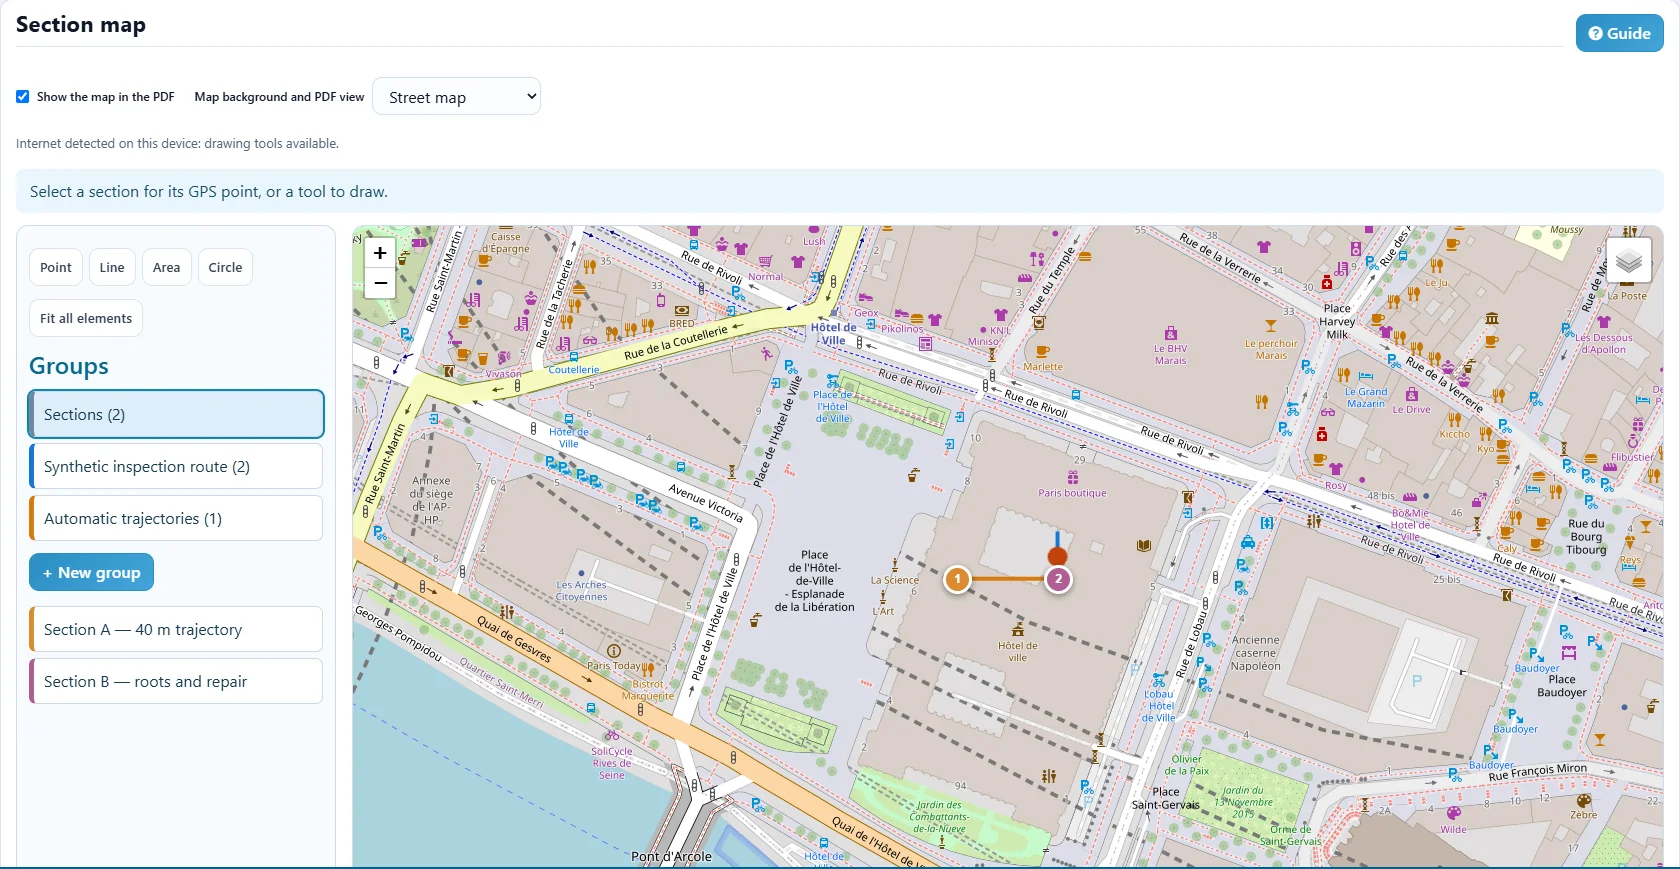
GPS: using browser location for a trajectory origin may prompt for permission. You can still document the job manually when GPS is unavailable.
Chapter 12 · section profile
Depths and estimated trajectory
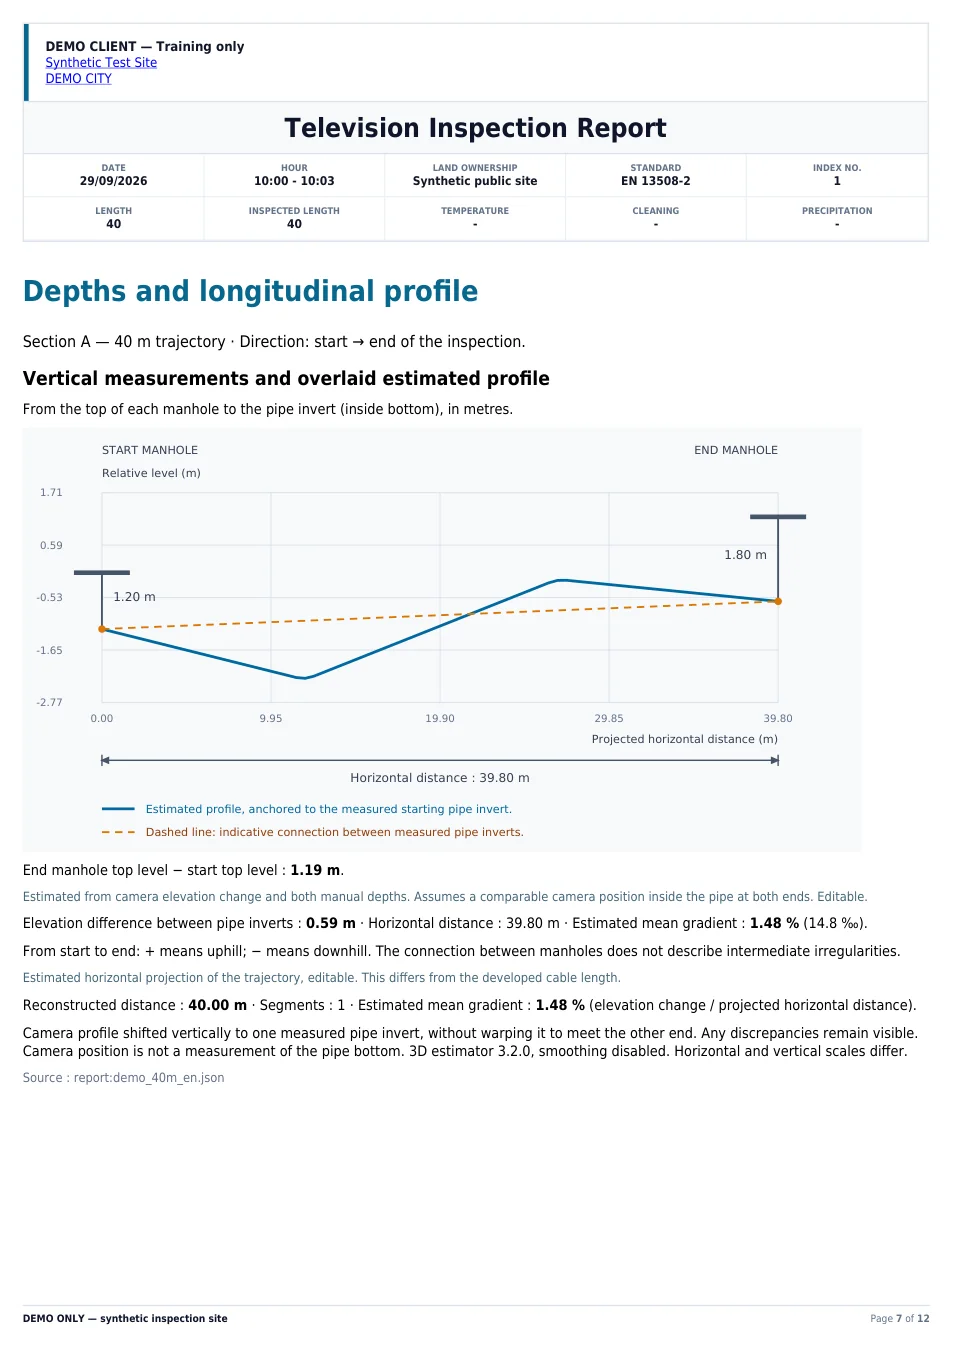
A section can store depths at the start and end and associated trajectory data. The 3D view and longitudinal profile help explain the route; interpret them according to the accuracy of the source data.
- Open the section's Depths and trajectory tab.
- Enter measured start and end depths with the correct unit, checking the section direction.
- Attach the available trajectory or progress data to the right section and confirm inspected length.
- Open the 3D visualization and compare the path, points of interest and longitudinal curve with recorded observations.
- Check the profile page in the PDF preview before finalizing.
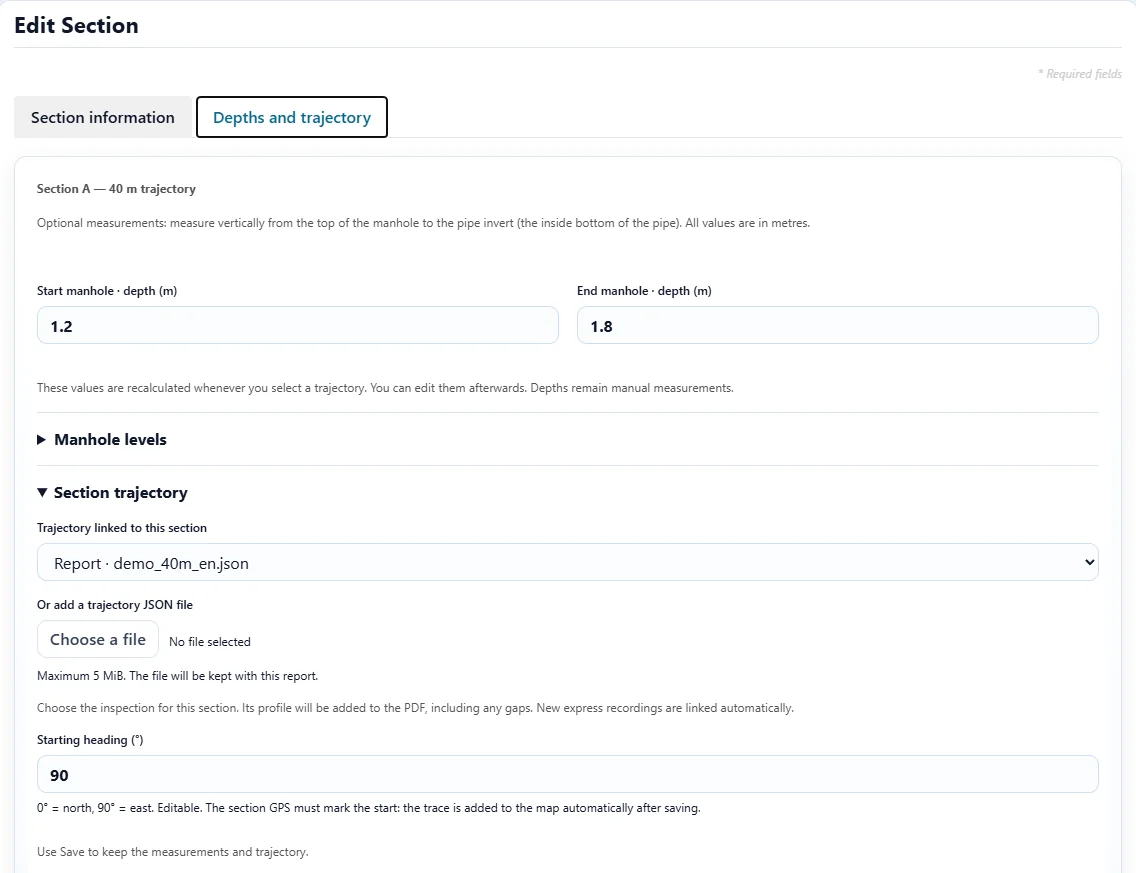
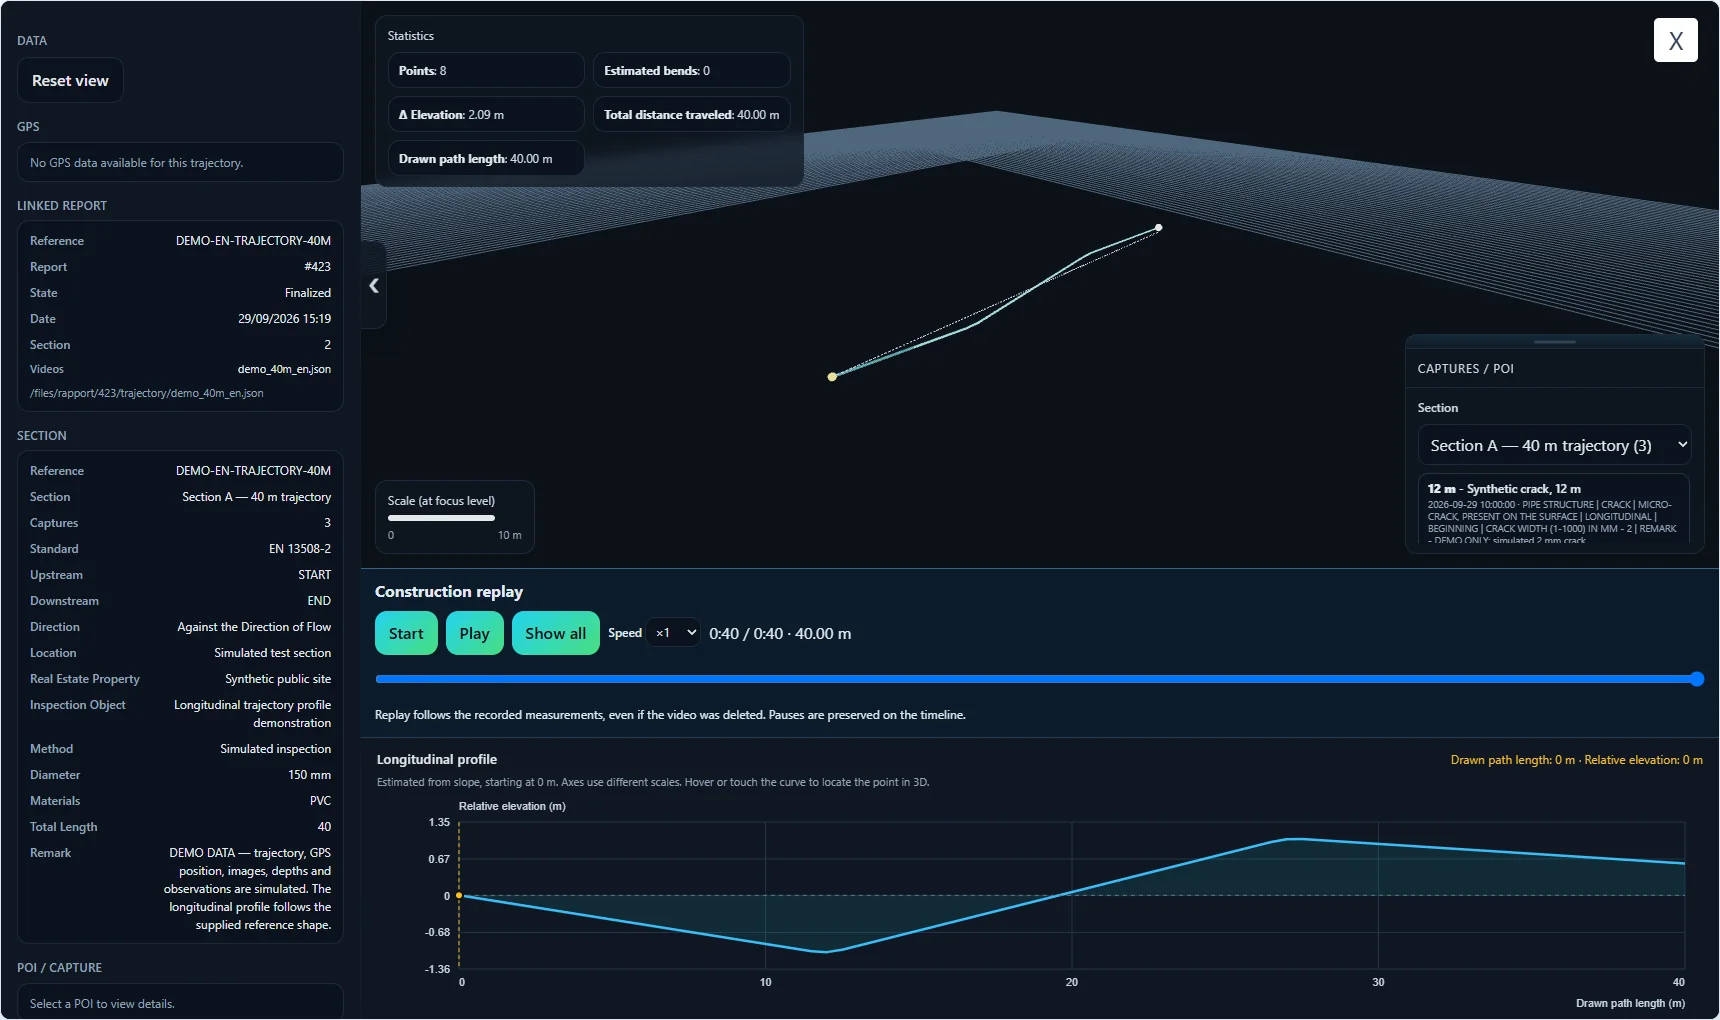
Simulated example: the curve, depths and elevation difference in DEMO-EN-TRAJECTORY-40M are not field measurements. A visual or computed estimate does not replace calibrated measurement.
Chapter 13 · optional transfer
Cloud connections and transfers
The Cloud control in the top bar shows connectivity and opens configuration when available. Internet access alone does not mean a cloud account is signed in.
- Confirm that the case has working Internet access.
- Open Cloud connection and expand ITS Cloud or Google Drive.
- For ITS Cloud, select the company and sign in with an authorized account. Visible jobs depend on account rights and company selection.
- Review connector status and permissions. Use the Help and Companies and keys tabs when needed.
- Save settings, then check the destination and result of each transfer from the job.
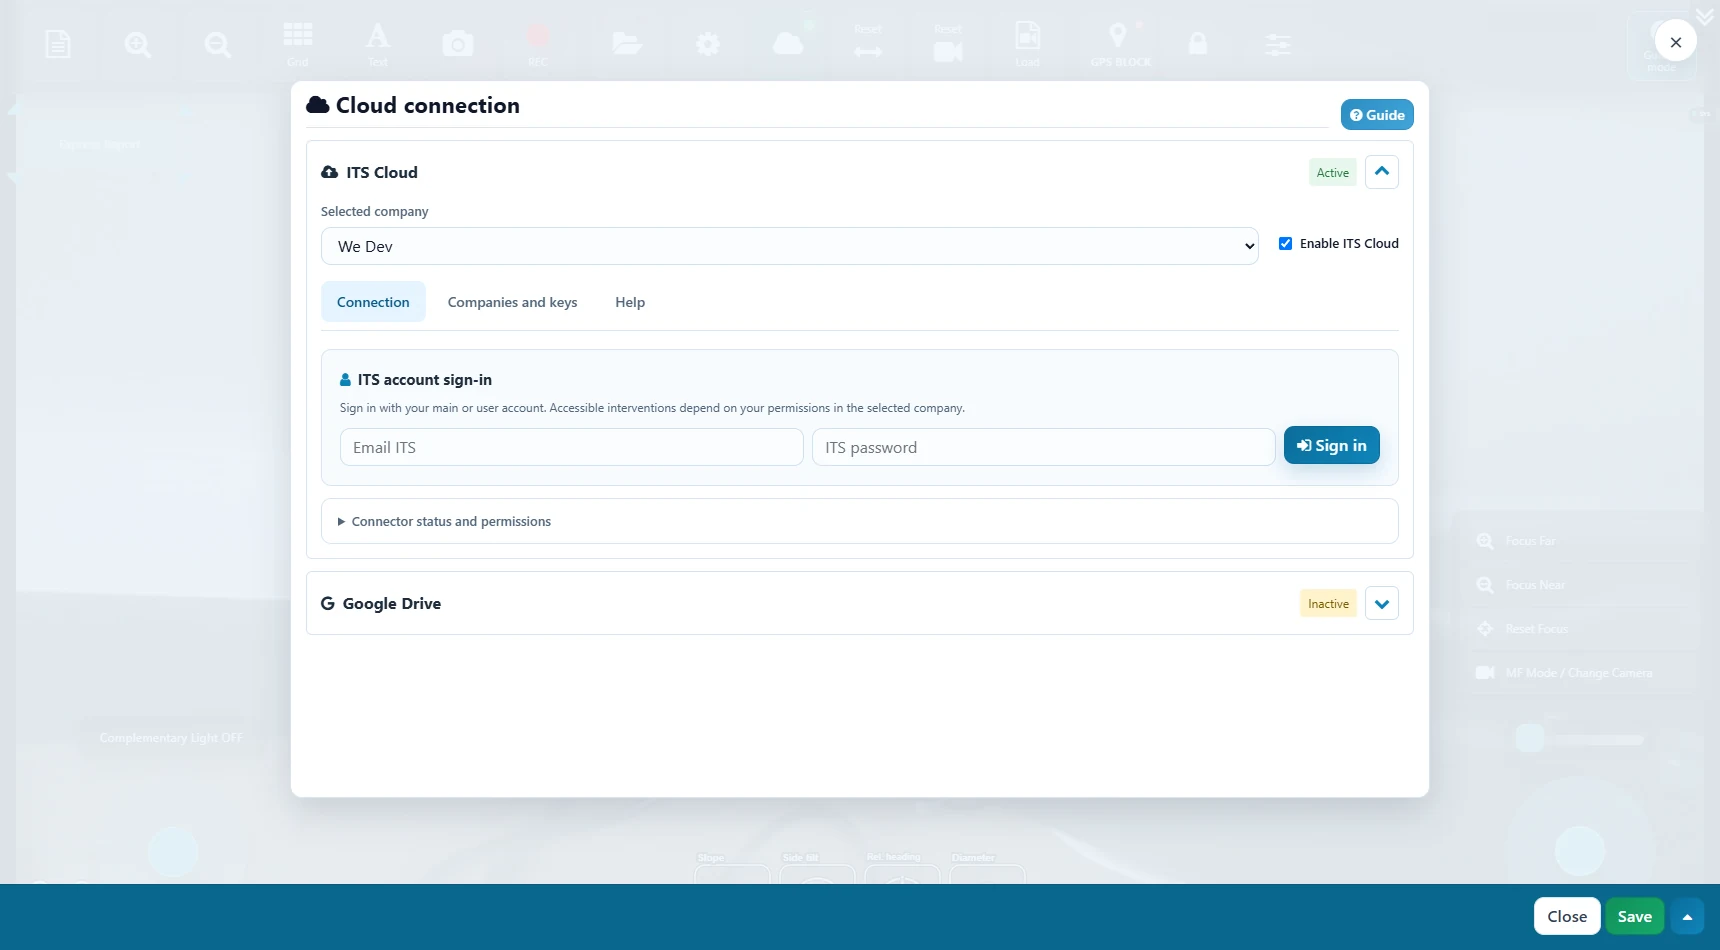
Offline: continue the inspection locally and keep the report on the case. Retry the transfer when connectivity and permissions are available.
Chapter 14 · handover
Review and export the PDF
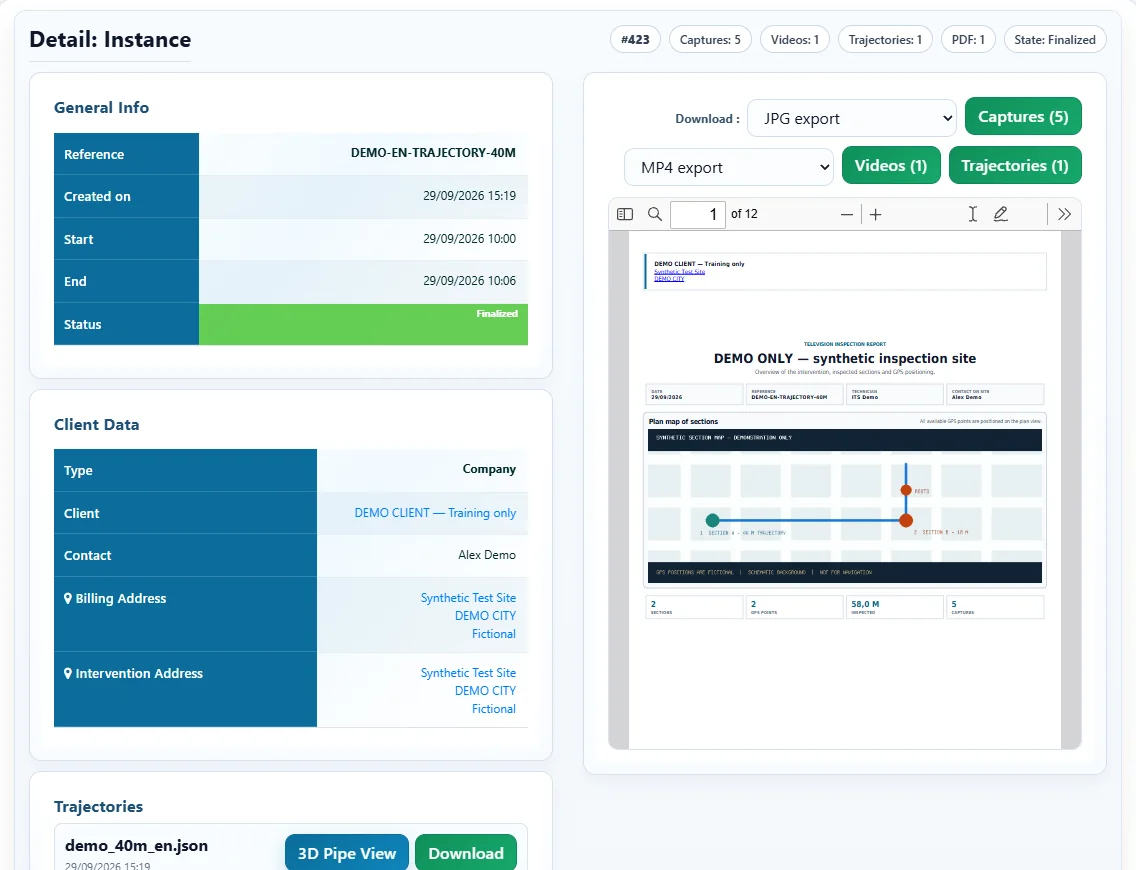
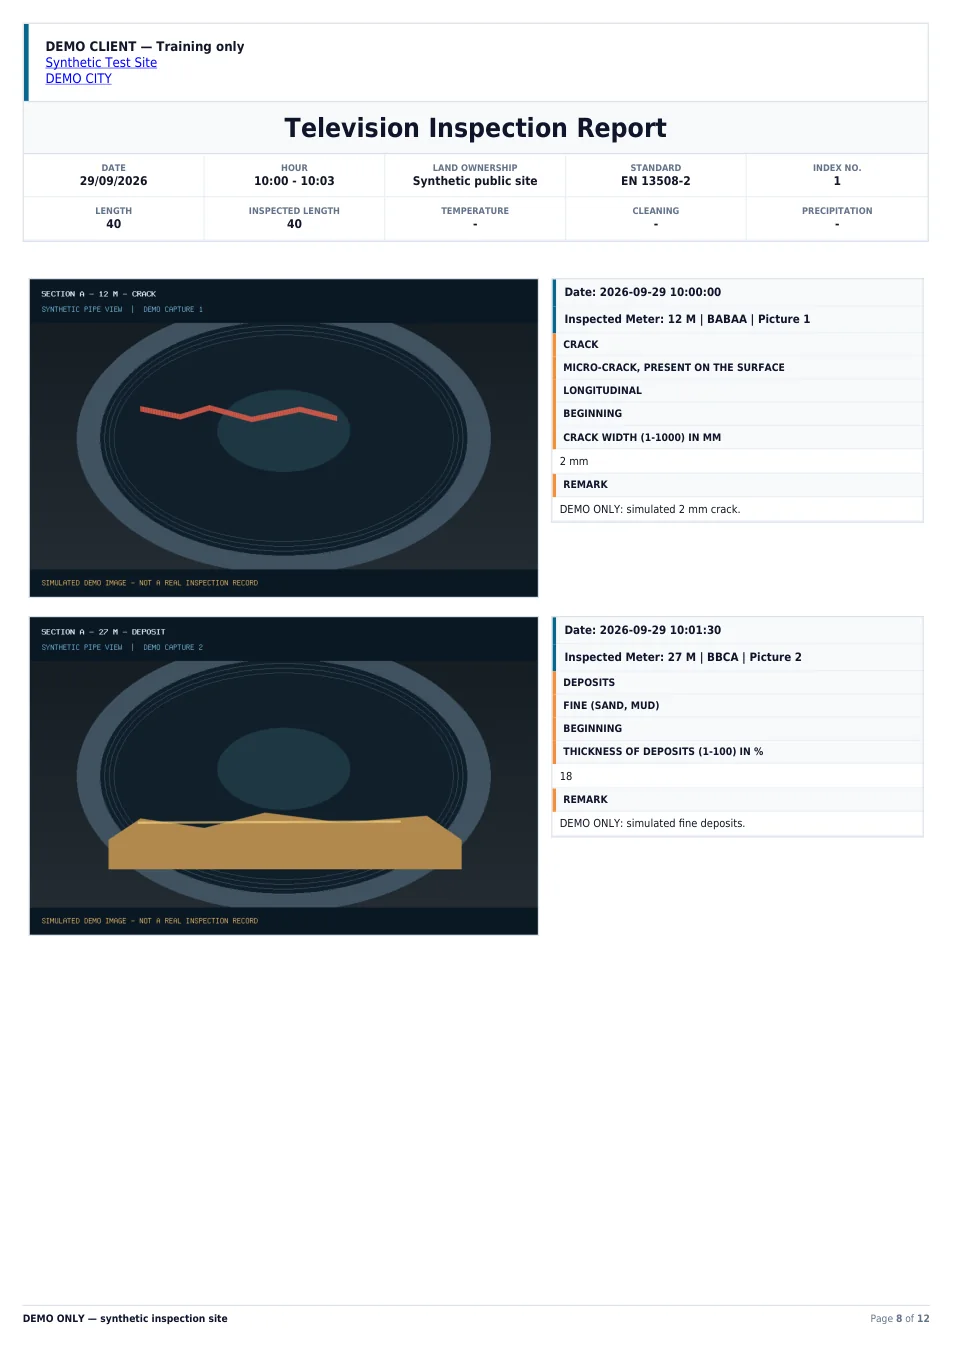
The report details bring together customer information, sections, captures, video, trajectories and documents. Review the preview before handover.
- Complete any fields marked as missing in the editor.
- Check that header, summary, sections, distances and observations agree.
- Open the PDF preview and browse cover, map, section settings, depths, profile and capture pages.
- Check text, units, dates and image quality. Correct the job if anything is missing.
- Finalize according to your workflow, then download or share the PDF from report details.
Chapter 15 · contextual help
Use the in-app guides
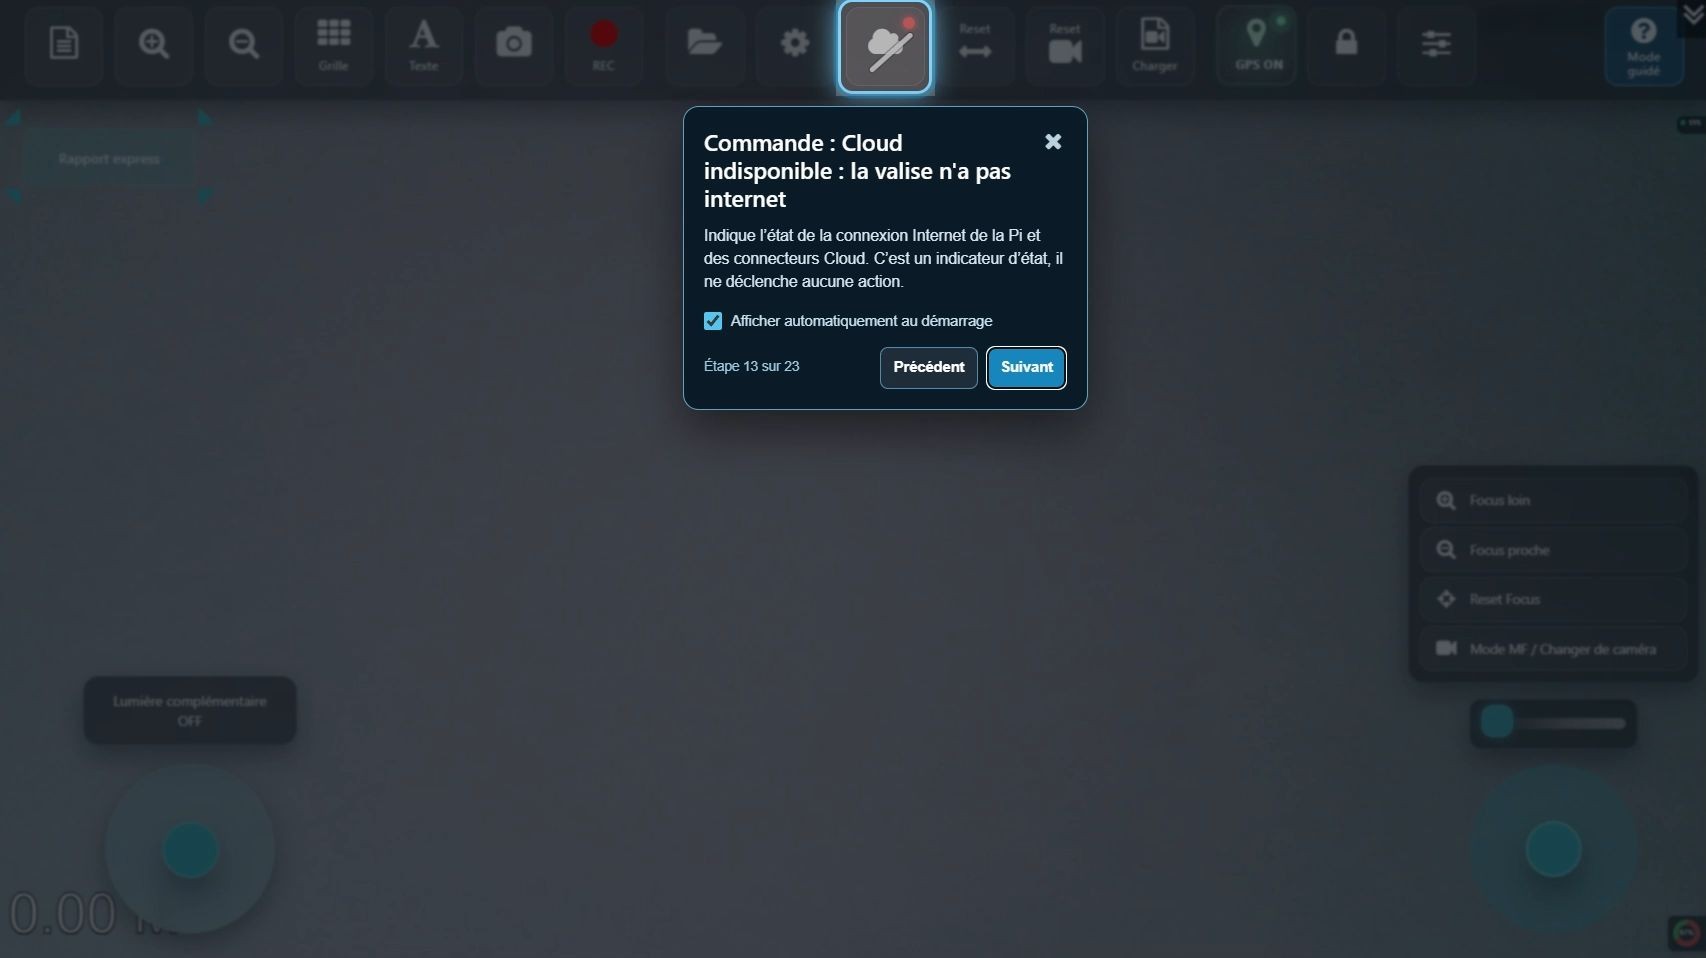
This manual complements the guided tours within ITS Report. They explain controls in their screen context and let you move forward or backward.
- Camera interface: open “Guided mode” or “?” to explore video, express report, captures, cloud, distance counter and hardware controls.
- Reports dashboard: the guide covers creating, searching, opening and editing a job.
- Editor and captures: window guides explain sections, media and qualification.
- Map and cloud: use the Help control in each window for its tools and settings.
The camera tour does not move the robot. Close it at any time, or change its automatic display at startup in the guide settings.
Chapter 16 · data continuity
Finish and safeguard the job
An inspection is complete once the required files have been checked and delivered to the intended destination.
- Stop active video recording and verify the file in Media.
- Save edits to every section, capture, map and depth entry.
- Open report details, check the status and generate the PDF preview.
- Download the PDF and any required media. Open the copies to verify file contents and job reference.
- If cloud transfer is required, check company, destination and transfer result. Keep a local copy until confirmed.
- Use the application's system shutdown control after recording and transfer are finished.
Software updates
The dashboard shows the installed version. When the inspection has finished, follow the case and Android update chapter to install a package and restart cleanly.
Do not delete local video, captures or the job merely because a transfer button was pressed. Verify the destination files first.
Chapter 17 · maintenance
Update the case and Android app
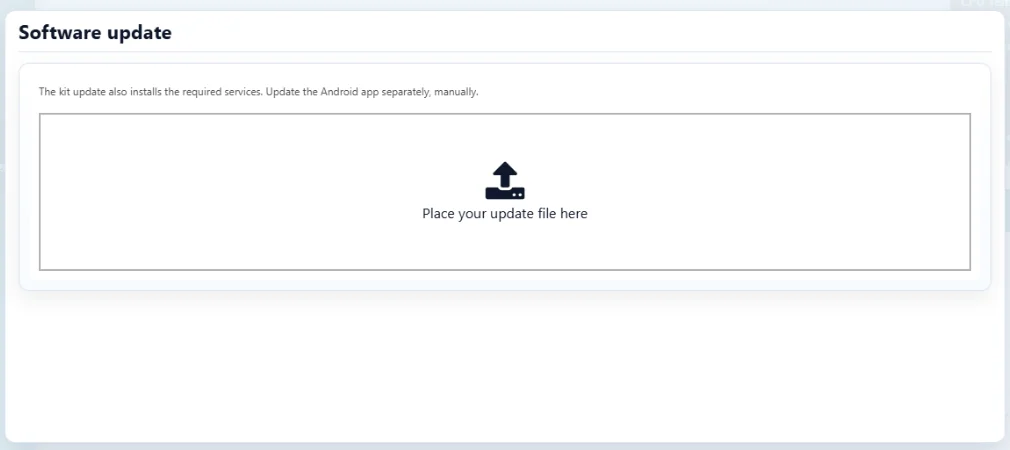
The Reports dashboard displays the installed version under Software update. Updating the case and updating the Android app are separate operations. A case package also installs needed server components; it does not install an APK on the tablet.
Before updating
- Finish the inspection, stop video recording and complete active transfers.
- Export and check any reports and media you need to keep. Confirm free storage and stable power.
- Record the version shown in the dashboard and obtain the .7z update package supplied for this case. The system checks package integrity and encryption; other file types are rejected.
Install the case package
- On a tablet or computer connected to the case, open Reports → Software update.
- Drop the
.7zfile into the upload area. Wait for upload and copy to finish; the window shows a progress bar and log. - Keep the case powered and do not start an inspection while copying. If an error appears, keep the message and do not reboot to force an incomplete update.
- When success is confirmed, click Restart device. Wait for the local interface to return; a temporary disconnect is normal.
- Check the new version, open a camera and report, and review settings relevant to your hardware.
Update the Android app separately
Manually install the ITS Report APK supplied for your equipment on a compatible Android tablet or phone. App version 1.1.3 requires Android 7.0 or newer and improves reconnection to the case Wi-Fi. Follow the APK/server compatibility guidance for your installation. After installation, join the case Wi-Fi, open the app, then test inspection, mapping and any transfers you use.
Restarting the case completes its software update; it does not update the Android app. Installing a new APK does not update the case server.
Chapter 18 · quick checks
Troubleshooting
Start with the basics: case powered, local network active, correct report open and action saved.
| Symptom | Check | Next step |
|---|---|---|
| Local page does not open | Case Wi-Fi, http://192.168.150.1, Chrome or Chromium Edge. | Wait for startup, reconnect Wi-Fi and reload. |
| No camera picture | Power, cables, selected source and video settings. | Check hardware, then restart the stream after stopping recording. |
| Capture missing from report | Report, section, saved media and associated distance. | Find the raw media and attach it to the right section. |
| Distance inconsistent | Counter origin, reset, inspection direction and unit. | Document and correct before finalizing. |
| Empty map | GPS, section points, chosen background and Internet for tiles. | Place available data manually or retry online tiles. |
| Missing or wrong 3D profile | Trajectory association, length and start/end depths. | Correct inputs, reopen 3D view and PDF preview. |
| Cloud unavailable | Case Internet, enabled connector, account, company and permissions. | Work locally and retry transfer when restored. |
| Incomplete PDF | Required fields, sections, captures, map setting and report status. | Return to the editor and regenerate the preview. |
If the issue continues, keep the report reference, time, installed version and a screenshot for support.
Chapter 19 · before delivery
Final checklist and demo report
Use this list before delivering an inspection.
- Correct customer, address, reference and operator.
- PDF header uses the intended logo and company or client details.
- Assigned technician and on-site contact reviewed.
- Consistent dates and times.
- Nodes, direction and settings present for each section.
- Start and end distances and observations reviewed.
- Readable photos attached to the correct section.
- Videos saved and accessible.
- Map and GPS reviewed where used.
- Depths and trajectory reviewed where entered.
- Every PDF page read and checked.
- PDF and media copied to the intended destination.
Explore the supplied example
DEMO-EN-TRAJECTORY-40M demonstrates two sections, a simulated 40 m trajectory, five captures and a 12-page English PDF. Customer, location, defects, depths and curve are fictional. Use it to explore features and layout; it is not a field inspection record.